
This is a simple task but a nice project to find your way around Xcode and Swift. We will build a small Cocoa application in Xcode that executes a shell command on the click of a button.
Note: I have a new post on this topic, updated for Swift 5.1 and SwiftUI.
For this example we will use the say command which use OS X’s text to speech to say a given text. You can try this by opening the Terminal and typing say "Hello world".
This tutorial is for Xcode 7.3 with OS X 10.11.4 El Capitan. It will probably not change too much with minor version changes, but no promises for major version differences.
All you need is a Mac with 10.11.4+ El Capitan and Xcode 7.3+ which you can download for free in the Mac App Store or Apple’s Developer page (free registration with any Apple ID required).
Creating the Project
Once you have downloaded and installed Xcode, launch it. It may prompt you for some extra installations and a password on first launch. Acknowledge those and you get to a splash screen with a few options. If you have used Xcode before it will list your previous projects. But for now, select “Create a new Xcode Project”.

On the next step Xcode suggests many templates to build your application from. Select “Application” under “OS X” and then the “Cocoa Application” icon. Then click next to continue.

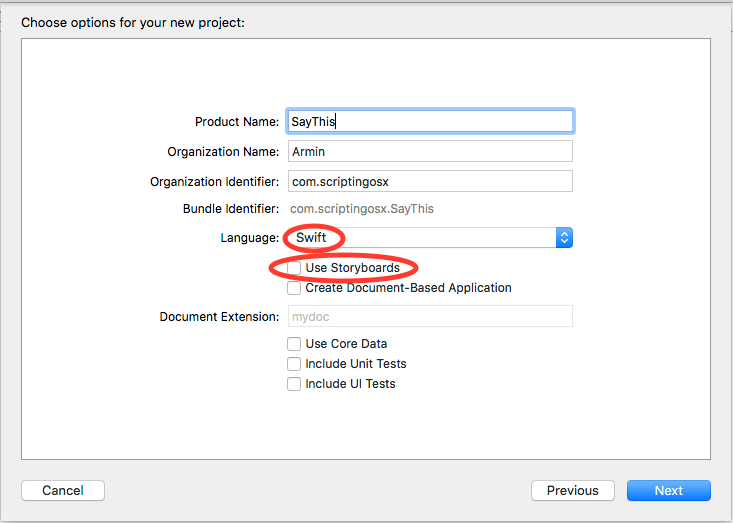
In the next step you will have to fill in some identification for your applications. For the “ProductName” or the name of the application enter “SayThis”. Fill your name or organization name into the next field. The identifier in the third field should follow a “reverse DNS schema” for your organization. It is ok to use more than two segments, like “com.example.department”. If you don’t really know what to put in here use your email or github account in reverse order, i.e. “com.gmail.username” or “com.github.username”.
For the language select Swift and disable “Use Storyboards” and every other checkbox here. Our first application is going to be very simple.
Finally, Xcode will ask you where to save the project. Xcode will create a folder named “SayThis” with all the necessary files. If you want, you can make the project folder a local git repository for version control.
Creating the Interface
The Xcode window has a navigation area or file selector on the left, a main editor area in the center and an utility or information panel on the right. There are buttons in top right toolbar to show and hide the left and right panels.
![]()
Right now the project itself is selected in the navigation area and the center editor shows various properties of the project. These were already set to useful defaults when the template was setup.
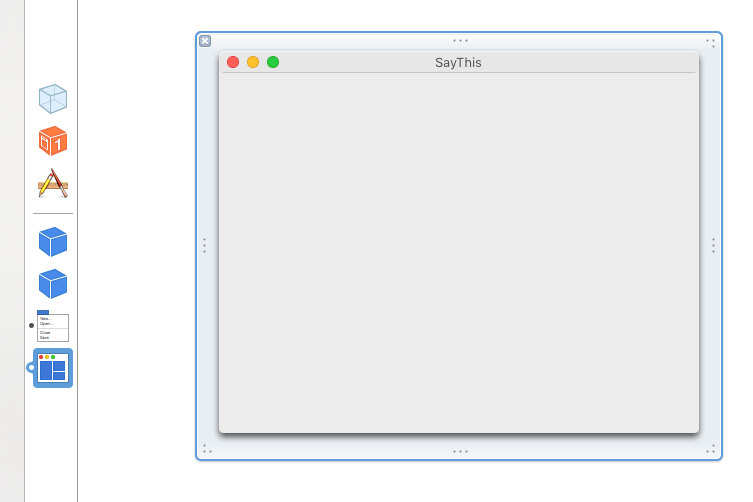
There are four files in this particular template. Select “MainMenu.xib”. xib files store how the interface looks like. The editor will change to a graphical area to design the interface. The application’s menu bar is at the top. However, there is no window to put an interface visible. There is a list of icons, next to the navigation bar, representing various objects in this xib file. The lowest is a window.
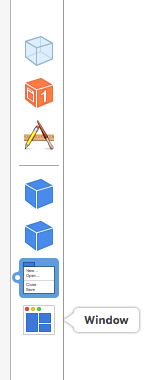
Click the icon to make the window visible in the editor area.
In the lower right corner of the Xcode window is a list of objects that can be added to the interface. You may have to select the circle icon with a square in it to see it. You can scroll through the list, but there are so many objects that it is easier to use the search field at the very bottom.

Enter ‘button’ in the search then drag the “Push Button” to your window. As you drag the button around the window, you will see blue lines appear, guiding the button to the right center line or the right distance from the edges of the window. Use the blue guide lines to drop the button in the center of the window.

You can double-click the text on the button to change the default label. Let’s use “Talk”. At this time you can already “Build and Run” the project. There is a “Play” triangle button in the upper right area of the window or you can choose “Run” from the project menu. Since this is the first time to build this project it will take a bit longer.
Xcode will launch the application after building and it should show the window with the “Talk” button. You can click the button, however aside from the standard click animation, nothing will happen, since we haven’t told the button to do anything yet.
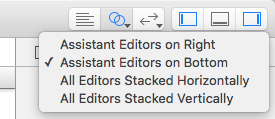
To connect the button to some action, we need to connect it to some code. We need to show the code and the UI side-by-side. There is a toolbar button on the right with two blue circles, click that and choose “Assistant Editors on Bottom” or “…on Right” (your choice) to open a second editor pane.
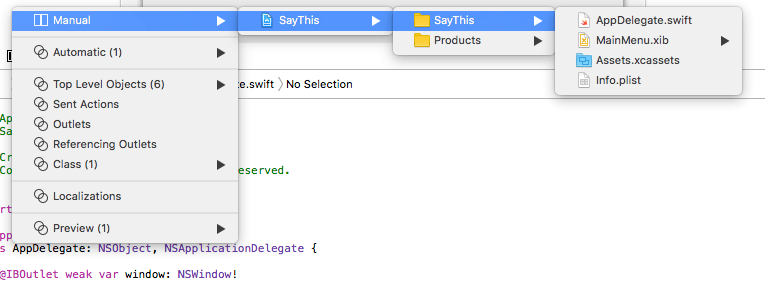
By default Xcode will show a header file we do not care about in the second panel. You can change this by clicking in the title bar of the second pane and selecting “Manual > SayThis > SayThis > AppDelegate.swift”

The template filled the AppDelegate.swift file with some code and one property that is connected to the window. We want perform an action method in the AppDelegate when the button it clicked. To make this connection hold the ctrl-key and drag from the button to the empty space in the AppDelegate below the two template function, but above the final closing brace }. When you end the drag there a small dialog will pop up asking for specific settings. Set it to be an action, name it talk and set the sender type to NSButton.
This inserts an empty action method into the AppDelegate class.
    @IBAction func talk(sender: NSButton) {
    }
The @IBAction is a label for the interface builder part of Xcode to know this function is available to connect to the UI. func designates this as a function, but since this is within the definition of the AppDelegate class it is actually a class method of AppDelegate. In the brackets we define one parameter, labelled sender of type NSButton. The curly braces enclose the function code which is still empty.
Insert the following code between the curly braces:
    @IBAction func talk(sender: NSButton) {
        let path = "/usr/bin/say"
        let arguments = ["hello world"]

        let task = NSTask.launchedTaskWithLaunchPath(path, arguments: arguments)
        task.waitUntilExit()
    }
While you are typing Xcode will suggest completions for the code that you are typing. This can be very helpful and helps you avoid typing errors. You can hit the tab-key to accept the suggestion.

The let statement is very particular to Swift and declares a variable as constant. The alternative label var would tell the compiler that we plan to change the content of the variable later. Choosing let and var properly will allow the compiler to optimize the resulting code. For example in this specific case, the compiler will use a non-mutable string and array class for our arguments, since they will not change later in the code.
If you replace let with var and build then the compiler will notice you are not modifying the variable and place a warning that you should use let instead.
![]()
Since the say command will not run within a shell and we cannot rely on environment variables being set, especially the PATH variable, we need to give the full path to the say command. To figure out the full path to a command you can use the which command in Terminal.
$ which say
/usr/bin/say
The arguments are passed as an array of Strings. Right now we have only a single static argument, but we could pass more, each option or argument will be its own String in the array. so if you wanted to use another voice you could extend the array to
let arguments = ["hello world", "-v", "Kathy"]
(One String per argument, no need to escape spaces.)
Finally we use the NSTask class to create and launch the command. Then the waitUntilExit() method of NSTask pauses code execution until the command finished.
There is a minor problem in the UI. If you hit the button quickly in succession, you will get multiple “hello worlds” on top of each other. One solution to that is to disable the button while the task is being processed. Alle interface elements have an enabled property we can use for that purpose. Change the talk method to this:
    @IBAction func talk(sender: NSButton) {
        let path = "/usr/bin/say"
        let arguments = ["hello world"]

        sender.enabled = false

        let task = NSTask.launchedTaskWithLaunchPath(path, arguments: arguments)
        task.waitUntilExit()

        sender.enabled = true
    }
Before we execute the task, we disable the button, then enable it later. Now, when you click the button it will be disabled while the task is running and be re-enabled afterwards.
Congratulations! You have built a simple OS X Application. In the next part, we will hook up a few more UI Elements to give the app some more functionality.
Nicely done. Thanks very much for the starter course! Moving right along now to step 2…
I’m trying to get a button in Xcode to run a shell script with clicked.
This works
@IBAction func test(_ sender: NSButton) {
let path = “/usr/bin/say”
let arguments = [“hello world”]
sender.isEnabled = false
let task = Process.launchedProcess(launchPath: path, arguments: arguments)
task.waitUntilExit()
sender.isEnabled = true
}
But when I try this it does not work to run a script from the Desktop
@IBAction func test(_ sender: NSButton) {
let path = “/bin/bash”
let arguments = [“~/Desktop/test.sh”]
sender.isEnabled = false
let task = Process.launchedProcess(launchPath: path, arguments: arguments)
task.waitUntilExit()
sender.isEnabled = true
}
I get this error output in Xcode
/bin/bash: ~/Desktop/test.sh: No such file or directory
If anyone can help me with some help or example that would great. Thank you.
This command is not executed by bash, so the ‚~‘ is not expanded into the user home. You have to put the absolute path in there.
Hi, i’m hoping you can point me in the right direction, i butchered the above tutorial to create the code below. Which works perfectly.
the command /usr/local/bin/minishift start generates sdtout on the console. How would I get that stdout to display within the app?
A text box? Seems i don’t know the right xcode words to google this properly..
Thanks in advance
//
// AppDelegate.swift
// MiniShift Launcher
//
import Cocoa
@NSApplicationMain
class AppDelegate: NSObject, NSApplicationDelegate {
@IBOutlet weak var window: NSWindow!
func applicationDidFinishLaunching(_ aNotification: Notification) {
// Insert code here to initialize your application
}
func applicationWillTerminate(_ aNotification: Notification) {
// Insert code here to tear down your application
}
@IBAction func start(_ sender: NSButton) {
let path = “/usr/local/bin/minishift”
let arguments = [“start”]
sender.isEnabled = false
let task = Process.launchedProcess(launchPath: path, arguments: arguments)
task.waitUntilExit()
sender.isEnabled = true
}
@IBAction func stop(_ sender: NSButton) {
let path = “/usr/local/bin/minishift”
let arguments = [“stop”]
sender.isEnabled = false
let task = Process.launchedProcess(launchPath: path, arguments: arguments)
task.waitUntilExit()
sender.isEnabled = true
}
}
The object you are looking for is a NSTextView. Ray Wenderlich has a more complete example, however it is still in swift 2. https://www.raywenderlich.com/125071/nstask-tutorial-os-x
Hay bro, I am quite liking writings on your site. They are created properly, easy to digest and memorize, despite English being my 3rd language. All the best.