I have talked a lot about the Terminal recently. One the most basic elements of a command shell is the prompt line, where you enter the command. Sometimes you have to move the cursor around the prompt line and there are more efficient ways of doing this than hitting the left arrow multiple times.
These key commands are for the default Terminal configuration with the bash shell.
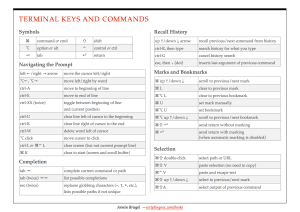
Recalling previous commands
Often you want to retry or re-use a previous command. Hitting the up arrow will recall the previous command, leaving the cursor at the end of the line, so you can either hit return to execute the command or edit it. You can hit the up arrow multiple times to go back further in your command history. You can also hit the down arrow to move forward again.
Instead of hitting the up arrow several times, you can also hit ctrl-R and start typing a command you used before. This will search through the history backwards and recall the latest command you used starting with what you typed. So ctrl-R and then typing cd will recall the last cd command you typed. When you get ‘stuck’ in the search mode you can leave it with ctrl-G.
Moving the cursor
Once you have recalled (or typed) a command and want to edit it, you will have to move the cursor.
The left and right arrows move the cursor left and right. You can use (option) ⌥-left (or right) to move word by word. You can use ctrl-A to jump to the beginning of the line and ctrl-E to jump to the end.
ctrl-XX (hold ctrl and press ‘x’ twice) will jump to the beginning of the line and then back to the current position the second time you use it.
If you recalled a wrong command, then you can clear the entire part left of the cursor with ctrl-U and the part right of the cursor with ctrl-K. There does not seem to be a keystroke that just clears the entire current line, but most of the time your cursor will be at the end of the line, so ctrl-U will do the trick.
And finally, you can option-click with the mouse pointer on a character in the command line to move the cursor there.
Selecting text
When you hold the option key, the mouse pointer will turn from the text insertion pointer to a cross. This is because the option key also switches text selection to rectangular. This can be useful when copying text from the table like output like ls -l or df.
As in any Mac application, you can double-click to select a word in the Terminal. However, for macOS a ‘word’ ends at special characters, including the /. This is annoying when you want to select a file path. If you double-click while holding command-shift Terminal will select the entire file path. This works for URLs, too.
Usually, you select some text to copy and paste it into the command prompt. You can take a short cut here, too. Terminal has a ‘Paste Selection’ command in the ‘Edit’ menu (command-shift-V). This way you save the ‘copy’ step.
And (as a recap from the post on marks) command-shift-A will select the output of the previous command.
Tab completes me
When you are typing commands, file names or paths, then you can use the tab key ⇥ to save keystrokes and typos.
For example you can type cd ~/Doc⇥ and it will complete to cd ~/Documents/. You can hit tab over and over at different parts of the command:
$ cd ~/Li⇥
$ cd ~/Library/Appl⇥
$ cd ~/Library/Application\ Su⇥
$ cd ~/Library/Application\ Support/
When there are multiple options to complete, bash will play an alarm sound, if you then press tab for the second time, it will list all options:
$ cd ~/D⇥<beep>⇥
Desktop/   Documents/ Downloads/
Using tab-completion not only saves keystrokes, and time, but also reduces the potential for typos and errors. Tab-completion will also automatically escape problematic characters such as spaces:
$ cd /Library/Appl⇥
$ cd /Library/Application\ Support/
Note: usually bash is case-sensitive. However, since the macOS filesystem (HFS+) is (for now) case-insensitive, you may want to switch tab-completion to be case-insensitive, too. The case-sensitivity of the file system may change with the upcoming APFS file system.
There is another form of completion which you invoke with pressing the esc(ape) key twice. This will replace bash ‘globbing’ characters such as ?, * and ~. For example:
$ cd ~/Doc*[esc][esc]
$ cd /Users/armin/Documents
Note that this replaces the ~ and the *. When there are multiple possible expansions, there will be an alert sound. You can press esc twice again to see all possible expansions:
$ cd ~/D*[esc][esc]<beep>[esc][esc]
Desktop/   Documents/ Downloads/