We built this tool three years ago, mostly because we wanted to learn how to build an app like this on macOS. We think it worked out well. We learned a lot, and are glad the application was useful to some.
Since then, all the people involved in the EraseInstall Project have moved on to other jobs or other responsibilities. Unfortunately, this leaves us with no time or resources to maintain or improve EraseInstall.
The repository and the application will remain available in its current state. There will be no more updates. If someone feels they can take up the project and continue it, please do!
As I noted in my last Weekly News Summary, several open source projects for MacAdmins have completed their transition to Python 3. AutoPkg, JSSImport and outset announced Python 3 compatible versions last week and Munki already had the first Python 3 version last December.
Why?
Apple has included a version of Python 2 with Mac OS X since 10.2 (Jaguar). Python 3.0 was released in 2008 and it was not fully backwards compatible with Python 2. For this reason, Python 2 was maintained and updated alongside Python 3 for a long time. Python 2 was finally sunset on January 1, 2020. Nevertheless, presumably because of the compatibility issues, Apple has always pre-installed Python 2 with macOS and still does so in macOS 10.15 Catalina. With the announcement of Catalina, Apple also announced that in a “future version of macOS” there will be no pre-installed Python of any version.
Scripting language runtimes such as Python, Ruby, and Perl are included in macOS for compatibility with legacy software. Future versions of macOS won’t include scripting language runtimes by default, and might require you to install additional packages. If your software depends on scripting languages, it’s recommended that you bundle the runtime within the app. (macOS 10.15 Catalina Release Notes)
This also applies to Perl and Ruby runtimes and other libraries. I will be focussing on Python because it is used more commonly for MacAdmin tools, but most of this post will apply equally to Perl and Ruby. Just mentally replace “Python” for your preferred language.
The final recommendation is what AutoPkg and Munki are following: they are bundling their own Python runtime.
How to get Python
There is a second bullet in the Catalina release notes, though:
Use of Python 2.7 isn’t recommended as this version is included in macOS for compatibility with legacy software. Future versions of macOS won’t include Python 2.7. Instead, it’s recommended that you run python3 from within Terminal. (51097165)
This is great, right? Apple says there is a built-in Python 3! And it’s pre-installed? Just move all your scripts to Python 3 and you’ll be fine!
Unfortunately, not quite. The python3 binary does exist on a ‘clean’ macOS, but it is only a stub tool, that will prompt a user to download and install the Command Line Developer Tools (aka “Developer Command Line Tools” or “Command Line Tools for Xcode”). This is common for many tools that Apple considers to be of little interest to ‘normal,’ non-developer users. Another common example is git.
Dialog prompting to install the Command Line Tools
When you install Xcode, you will also get all the Command Line Developer Tools, including python3 and git. This is useful for developers, who may want to use Python scripts for build operation, or for individuals who just want to ‘play around’ or experiment with Python locally. For MacAdmins, it adds the extra burden of installing and maintaining either the Command Line Developer Tools or the full Xcode install.
Python Versions, a multitude of Snakes
After installing Xcode or the Command Line Developer Tools, you can check the version of python installed: (versions on macOS 10.15.3 with Xcode 11.3.1)
When you go on the download page for Python.org, you will get Python 3.8.1 (as of this writing). But, on that download page, you will also find download links for “specific versions” which include (as of this writing) versions 3.8.1, 3.7.6, 3.6.10, 3.5.9, and the deprecated 2.7.17.
The thing is, that Python isn’t merely split into two major release versions, which aren’t fully compatible with each other, but there are several minor versions of Python 3, which aren’t fully compatible with each other, but are still being maintained in parallel.
Developers (individuals, teams, and organisations) that use Python will often hold on to a specific minor (and sometimes even patch) version for a project to avoid issues and bugs that might appear when changing the run-time.
When you install the latest version of Munki, it will install a copy of the Python framework in /usr/local/munki/ and create a symbolic link to that python binary at /usr/local/munki/python. You can check its version as well:
 % /usr/local/munki/python --version
Python 3.7.4
All the Python code files for Munki will have a shebang (the first line in the code file) of
#!/usr/local/munki/python
This ensures that Munki code files use this particular instance of Python and no other copy of Python that may have been installed on the system.
The latest version of AutoPkg has a similar approach:
In both cases the python binary is a symbolic link. This allows the developer to change the symbolic link to point to a different Python framework. The shebangs in the all the code files point to the symbolic link, which can be changed to point to a different Python framework.
This is useful for testing and debugging. Could MacAdmins use this to point both tools to the same Python framework? Should they?
The Bridge to macOS
On top of all these different versions of Python itself, many scripts, apps, and tools written in Python rely on ‘Python modules.’ These are libraries (or frameworks) of code for a certain task, that can be downloaded and included with a Python installation to extend the functionality of Python.
The most relevant of these modules for MacAdmins is the “Python Objective-C Bridge.” This module allows Python code to access and use the native macOS Cocoa and CoreFoundation Frameworks. This not only allows for macOS native GUI applications to be written in Python (e.g. AutoDMG and Munki’s Managed Software Center [update: MSC was re-written in Swift last year]), but also allows short scripts to access system functions. This is sometimes necessary to get a data that matches what macOS applications “see” rather than what the raw unix tools see.
For example, the defaults tool can be used to read the value of property lists on disk. But those might not necessarily reflect the actual preference value an application sees, because that value might be controlled by a different plist file or configuration profile.
You could build a tool with Swift or Objective-C that uses the proper frameworks to get the “real” preference value. Or you can use Python with the Objective-C bridge:
#!/usr/bin/python
from Foundation import CFPreferencesCopyAppValue
print CFPreferencesCopyAppValue("idleTime", "com.apple.screensaver")
Three simple lines of Python code. This will work with the pre-installed Python 2.7, because Apple also pre-installs the Python Objective-C bridge with that. When you try this with the Developer Tools python3 you get an error:
ModuleNotFoundError: No module named 'Foundation'
This is because the Developer Tools do not include the Objective-C bridge in the installation. You could easily add it with:
> sudo python3 -m pip install pyobjc
But again, while this command is “easy” enough for a single user on a single Mac, it is just the beginning of a Minoan labyrinth of management troubles.
Developers and MacAdmins, have to care about the version of the Python they install, as well as the list of modules and their versions, for each Python version.
It is as if the Medusa head kept growing more smaller snakes for every snake you cut off.
(Ok, I will ease off with Greek mythology metaphors.)
You can get a list of modules included with the AutoPkg and the Munki project with:
> /usr/local/munki/python -m pip list
> /usr/local/autopkg/python -m pip list
You will see that not only do Munki and AutoPkg include different versions of Python, but also a different list of modules. While Munki and AutoPkg share many modules, their versions might still differ.
Snake Herding Solutions
Apple’s advice in the Catalina Release Notes is good advice:
It’s recommended that you bundle the runtime within the app.
Rather than the MacAdmin managing a single version of Python and all the modules for every possible solution, each tool or application should provide its own copy of Python and its required modules.
This might seem wasteful. A full Python 3 Framework uses about 80MB of disk space, plus some extra for the modules. But it is the safest way to ensure that the tool or application gets the correct version of Python and all the modules. Anything else will quickly turn into a management nightmare.
This is the approach that Munki and AutoPkg have chosen. But what about smaller, single script solutions? For example simple Python scripts like quickpkg or prefs-tool?
Should I bundle my own Python framework with quickpkg or prefs-tool? I think that would be overkill and I am not planning to do that. I think the solution that Joseph Chilcote chose for the outset tool is a better approach for less complex Python scripts.
In this case, the project is written to run with Python 3 and generic enough to not require a specific version or extra modules. An admin who wants to use this script or tool, can change the shebang (the first line in the script) to point to either the Developer Tool python3, the python3 from the standard Python 3 installer or a custom Python version, such as the Munki python. A MacAdmin would have to ensure that the python binary in the shebang is present on the Mac when the tool runs.
You can also choose to provide your organization’s own copy Python with your chosen set of modules for all your management Python scripts and automations. You could build this with the relocatable Python tool and place it in a well-known location the clients. When updates for the Python run-time or modules are required, you can build and push them with your management system. (Thanks to Nathaniel Strauss for pointing out this needed clarifying.)
When you build such scripts and tools, it is important to document which Python versions (and module versions) you have tested the tool with.
(I still have to do that for my Python tools.)
What about /usr/bin/env python?
The env command will determine the path to the python binary in the current environment. (i.e. using the current PATH) This is useful when the script has to run in various environments where the location of the python binary is unknown.
This is useful when developers want to use the same script in different environments across different computers, user accounts, and platforms. However, this renders the actual version of python that will interpret the script completely unpredictable.
Not only is it impossible to predict which version of Python will interpret a script, but you cannot depend on any modules being installed (or their versions) either.
For MacAdmin management scripts and tools, a tighter control is necessary. You should use fixed, absolute paths in the shebang.
Conclusion
Managing Python runtimes might seem like a hopeless sisyphean task. I believe Apple made the right choice to not pre-install Python any more. Whatever version and pre-selection of module versions Apple would have chosen, it would only have been the correct combination for a few Python solutions and developers.
While it may seem wasteful to have a multitude of copies of the Python frameworks distributed through out the system, it is the easiest and most manageable solution to ensure that each tool or application works with the expected combination of run-time and modules.
In this post, I will describe how to build a simple Mac app which runs a shell command using SwiftUI.
SwiftUI is the new framework from Apple to build user interfaces across platforms. Applications built with Swift UI will require 10.15 Catalina and higher. As you will see, SwiftUI does simplify a lot of the work of creating the user interface. I believe that learning SwiftUI now will be a good investment into the future.
I have written this post with Xcode 11.2.1 on macOS Catalina 10.15.1. That means we are using Swift 5.1. You can download Xcode from the Mac App Store or Apple’s developer page.
In this post, we will be using the say command to make the Mac speak. You can test the command by opening the Terminal and entering
> say "Hello World"
The say command is a simple and fun stand in for other command line tools. It also provides instant feedback, so you know whether it is working or not. That said, when you want to provide text-to-speech functionality in a Swift app, you should probably use the text-to-speech frameworks, rather than sending out a shell command.
Nevertheless, for Mac Admin tasks, there are some that are only possible, or at least much easier, with shell tools.
First: Swift UI hello world
Before we get to more complicated things, let’s honor the classics and build a “Hello, World” application using Swift UI.
Open Xcode and from the project picker select “New Project.”
In the template chooser select ‘macOS’ and ‘Application’. Then click ‘Next.’
In the next pane, enter a name for the project: “SayThis.” Verify the other data and make sure the choice for ‘User Interface’ is ‘SwiftUI’. Then click ‘Next.’
The window with the new project will have four vertical panes. You can use the controller element in the top right of the toolbar to hide the right most “Inspector” pane as we will not need it.
Click it the “Play” button in the top left to build and run the template code, a window should open which show the place holder text “Hello World!”
When you return to Xcode the preview pane on the right should now be active and also display the “Hello World!” text. If it does not there should be a “Resume” button at the top of the preview pane (also called “Canvas”) which you can click to make Xcode resume live updating the preview. There are many situations that will stop Xcode from continuously updating the preview and you can click this button to resume.
The left column shows a list of files in this project. Select the ContentView.swift file. This file contains the Swift UI code that sets up the interface. You will see the code in the center pane. The relevant part of the code is:
struct ContentView: View {
    var body: some View {
        Text("Hello, World!")
            .frame(maxWidth: .infinity, maxHeight: .infinity)
    }
}
The ContentView contains a body which contains a Text element with the text Hello World!. at the end of the Text object, you a ‘modifier’ that sets the frame of the Text object to use all available space.
Hello, me!
In the code pane, change World to something else:
Text("Hello, Armin!")
You will see that the text in the preview pane updates as you change the code.
Note: there are several reasons Xcode might stop updating and when it does, you will have to hit the ‘Resume’ button above the preview pane.
The preview pane or canvas allows you to edit as well. When you (command) ⌘-click on the “Hello, …” text in the canvas, you will get an “Action menu.”
The first item in the action menu: “Show SwiftUI Inspector” will an inspector with the attributes or “modifiers” of the text object. Note that, even though there is no visual indication, the inspector view can be scrolled to reveal more options.
Change the font of the text to Body. The preview in the canvas will update, as well as the code. The code will now look like:
I have broken the modifiers into their own lines for clarity.
Stacking it up… or down… or sideways…
The SwiftUI body can only contain one object. But there are SwiftUI objects that you can use to group multiple objects together. Command-Click on the text and choose “Embed in VStack” from the action menu.
The VStack stands for ‘vertical stack.’ The VStack and its sibling the HStack (horizontal) can contain multiple objects. So, you can add another Text over our “Hello” text:
This adds the "SayThis" text above the "Hello, ..." text in a larger font. I have also moved the .frame(...) modifier to the VStack because that leads to a nicer output. Feel free to apply the .frame modifer to different objects to see how that affects the layout.
The text is a little bit close together, so we can add some .padding() modifiers:
You can choose to change the properties using the inspector UI or in the code. Either way the changes should be reflected in the canvas and the code.
Adding some interaction…
Now we want to add some interaction. Eventually, we want the user to be able to enter some text, which will be sent to the say command. Before we get, we will add a field, to enter some text.
To add a TextField where the user can enter text to the layout, click on the + icon in the top right of the tool bar. A window will appear with SwiftUI objects. Enter TextField in the search area to find the TextField object and drag it between the two text items.
You will want to add a .padding() modifier to the text field as well.
We also need a local variable in our ContentView to store the value of the TextField. Add this variable declaration under the struct ContentView definition and before the body declaration:
@State var message = "Hello, World!"
This adds and initializes a variable named message. The @State marker tells SwiftUI this ‘State’ variable will be used with the view. The variable is part of the ‘state’ of the view. Changes to the variable will immediately update the UI and vice versa.
Use the message variable for the TextField and Text objects:
@State var message = "Hello, World!"

var body: some View {
    VStack {
        Text("SayThis")
            .font(.largeTitle)
            .padding()
        TextField("Message", text: $message)
            .padding()
        Text(message)
            .font(.body)
            .padding()
    }.frame(maxWidth: .infinity, maxHeight: .infinity)
}
When you look at this interface in the preview pane, you will see that the contents of the message variable are reflected in the TextField and Text. To test the interactivity, you need to either ‘build and run’ the application or hit the ‘Play’ button in the preview. Then you can change the text in the text field and immediately see the changes displayed in the Text below.
Declaring the message variable as a @State will automatically set up all the notifications for these seamless updates.
Buttons and Actions
While updating another object is quite cool, it is not what we set out to do. Let’s get back on track.
Remove the last Text(message) and all its modifiers.
Command-click on the TextField and use the action menu to embed it in an HStack (horizontal stack)
Drag a Button from the object Library (you can open this with the ‘+’ button in the top right of the window) next to the text field
You can change the label of the button by changing the Text object inside of it. Change "Button" to "Say". You also want to add a .padding() modifier to the button.
The preview should now look like this:
The action of the Button is a code block that will be run when the button is clicked. Add the code between the action closure brackets:
This uses the run() convenience method of the Process class. You need to provide the full path to the command line tool. You can determine the full path in Terminal with the which command:
> which say
/usr/bin/say
The arguments to the say command need to be provided as an Array of Strings. The process is launched asynchronously, so the main thread continues immediately. We can also provide a code block that will be executed when the Process terminates. For now, we have no code that needs to be run on termination, so we set the terminationHandler to nil.
Note: using the try! statement to crash when this method throws an exception is lazy. I use it here to simplify the code drastically. Process.run() will throw an error when the file at exectableURL does not exist or is not executable. We can be fairly certain the /usr/bin/say executable exists, so the try! statement is justifiable. You should probably add proper error prevention and handling in production code.
Updating the Interface
The say command is executed asynchronously. This means that it will be running in the background and our user interface remains responsive. However, you may want to provide some feedback to the user while the process is running. One way of doing that, is to disable the ‘Say’ button while the process is running. Then you can re-enable it when the process is done.
Add a second @State variable to track whether our process is running:
@State var isRunning = false
Add a .disabled(isRunning) modifier to the Button. This will disable the button when the value of the isRunning variable changes to true.
Then we add a line in the Button action code to set that variable to true. We also add a code block to the terminationHandler which sets its value back to false:
The upcoming macOS 10.15 Catalina will require more apps and tools to be notarized. Apple has somewhat loosened the requirements at last minute, but these changed limitations are only temporary, to give developers more time to adapt.
Notarizing Mac Application bundles has its pitfalls, but is overall fairly well documented. However, I have been working on some command line tools written in Swift 5 and figured out how to get those properly signed and notarized.
Howard Oakley has written up his experiences and that post was extremely helpful. But there were a few omissions and some steps that aren’t really necessary, so I decided to make my own write-up.
And yes, there is a script at the end…
Note: these instructions are for macOS 10.14.6 Mojave, Xcode 10.3 and Swift 5.0. It is very likely that the details will change over time.
Update 2019-09-24: Tested with Xcode 11 and it still works (the screen layout has changed for some of the options)
What do you need?
Apple Developer Account (Personal or Enterprise, the free account does not provide the right certificates)
Xcode 10.3 or 11
Developer ID Certificates (Application and Install)
Application Specific Password for your Developer account
a Command Line Tool Project that you want to sign and notarize
That’s a longish list. If you are already building command line tools in Xcode, you should have most of these covered already. We will walk through the list step-by-step:
You cannot get the required certificates with a free Apple Developer account, unless you are member of a team that provides access.
Xcode
You can download Xcode from the Mac App Store or the developer download page. When you launch Xcode for the first time, it will prompt for some extra installations. Those are necessary for everything to in the article to work.
Developer ID Certificates
There are multiple certificates you can get from the Developer Program. By default you get a ‘Mac Developer’ certificate, which you can use for building and testing your own app locally.
To distribute binaries (apps and command line tools) outside of the App Store, you need a ‘Developer ID Application’ certificate. To sign installer packages for distribution outside of the Mac App Store, you need a ‘Developer ID Installer’ certificate.
We will need both types of Developer ID certificates, the first to sign the command line tool and the second to sign and notarize the installer package.
If you have not created these yet, you can do so in Xcode or in the Developer Portal. If you already have the certificates but on a different Mac, you need to export them and re-import them on the new Mac. Creating new certificates might invalidate the existing certificates! So beware.
Once you have created or imported the certificates on your work machine, you can verify their presence in the Terminal with:
% security find-identity -p basic -v
This command will list all available certificates on this Mac. Check that you can see the ‘Developer ID Application’ and ‘Developer ID Installer’ certificates. If you are a member of multiple teams, you may see multiple certificates for each team.
You can later identify the certificates (or ‘identities’) by the long hex number or by the descriptive name, e.g. "Developer ID Installer: Armin Briegel (ABCD123456)"
The ten character code at the end of the name is your Developer Team ID. Make a note of it. If you are a member of multiple developer teams, you can have multiple Developer ID certificates and the team ID will help you distinguish them.
Application Specific Password for your Developer Account
Apple requires Developer Accounts to be protected with two-factor authentication. To allow automated workflows which require authentication, you can create application specific passwords.
Create a new application specific password in Apple ID portal for your developer account.
You will only be shown the password when you create it. Immediately create a ‘New Password Item’ in your Keychain with the following fields:
Keychain Item Name: Developer-altool
Account Name: your developer account email
Password: the application-specific password you just created
This will create a developer specific password item that we can access safely from the tools.
If you want, you can also store the app specific password in a different password manager, but the Xcode tools have a special option to use Keychain.
A Command Line Tool Project
You may already have a project to create a command line in Xcode. If you don’t have one, or just want a new one to experiment, you can just create a new project in Xcode and choose the ‘Command Line Tool’ template from ‘macOS’ section in the picker. The template creates a simple “Hello, world” tool, which you can use to test the notarization process.
My sample project for this article will be named “hello.”
Preparing the Xcode Project
The default settings in the ‘Command Line Tool’ project are suitable for building and testing the tool on your Mac, but need some changes to create a distributable tool.
Choosing the proper signing certificates
Before you can notarize the command line tool, it needs to be signed with the correct certificates.
in Xcode, select the blue project icon in the left sidebar
select the black “terminal” icon with your project’s name under the “Targets” list entry
make sure the ‘General’ tab is selected
under ‘Signing’ disable ‘Automatically manage signing’
under ‘Signing (Debug)’ choose your Team and choose ‘Developer ID Application’ as the certificate
under ‘Signing (Release)’ choose your Team and choose ‘Developer ID Application’ as the certificate
Setting the certificates
Enable Hardened Runtime
Enabling the ‘Hardened Runtime’ will compile the binary in a way that makes it harder for external process to inject code. This will be requirement for successful notarization starting January 2020.
from the view where you changed the signing options, click on ‘Build Settings’ in the upper tab row
click on ‘All’ to show all available settings
enter ‘enable hardened’ in the search field, this will show the ‘Enable Hardened Runtime’ setting
set the value in the project column (blue icon) to YES
Enable Hardened Runtime
Change the Install Build Location
If we want to automate the packaging and notarization, we need to know where Xcode builds the binary. The default location is in some /tmp subdirectory and not very convenient. We will change the location for the final binary (the ‘product’) to the build subdirectory in the project folder:
in the same view as above, enter ‘Installation Build’ in the search field, this will show the ‘Installation Build Products Location’ setting
double click on the value in the Project column (blue icon), this will open a popup window
change the value to $SRCROOT/build/pkgroot
Change the Installation Build location
If you manage your code in git or another VCS, you want to add the build subdirectory to the ignored locations (.gitignore)
Build the Binary
You can use Xcode to write, test, and command line tool debug your. When you are ready to build and notarize a pkg installer, do the following:
open Terminal and change directory to the project folder
% xcodebuild clean install
This will spew a lot of information out to the command line. You will see a build subdirectory appear in the project folder, which will be filled with some directories with intermediate data.
After a successful build you should see a pkgroot directory in the build folder, which contains your binary in the usr/local/bin sub-path.
/usr/local/bin is the default location for command line tools in the Command Line Tool project template. It suits me fine most of the time, but you can change it by modifying the ‘Installation Directory’ build setting in Xcode and re-building from the command line.
Build the pkg
Command Line Tools can be signed, but not directly notarized. You can however notarize a zip, dmg, or pkg file containing a Command Line Tool. Also, it is much easier for users and administrators to install your tool when it comes in a proper installation package.
We can use the pkgroot directory as our payload to build the installer package:
I have broken the command into multiple lines for clarity, you can enter the command in one line without the end-of-line backslashes \. You want to replace the values for the identifier, version and signing certificate with your data.
This will build an installer package which would install your binary on the target system. You should inspect the pkg file with Pacifist or Suspicious Package and do a test install on a test system to verify everything works.
If you want to learn more about installer packages and pkgbuild read my book “Packaging for Apple Administrators.”
Notarizing the Installer Package
Xcode has a command line tool altool which you can use to upload your tool for notarization:
The asc-provider is your ten digit Team ID. If you are only a member in a single team you do not need to provide this.
The password uses a special @keychain: keyword that tells altool to get the app-specific password out of a keychain item named Developer-altool. (Remember we created that earlier?)
This will take a while. When the command has successfully uploaded the pkg to Apple’s Notarization Servers, it will return a RequestUUID. Your notarization request will be queued and eventually processed. You can check the status of your request with:
Apple will also send an email to your developer account when the process is complete. I my experience this rarely takes more than a minute or two. (Being in Central EU time zone might be an advantage there). When the process is complete, you can run the above notarization-info command to get some details. The info will include a link that contains even more information, which can be useful when your request is rejected.
Note that the info links expire after 24 hours or so. You should copy down any information you want to keep longer.
Completing the Process
You will not receive anything back from Apple other than the confirmation or rejection of your request. When a Mac downloads your installer package and verifies its notarization status it will reach out to Apple’s Notarization servers and they will confirm or reject the status.
If the Mac is offline at this time, or behind a proxy or firewall that blocks access to the Apple Servers, then it cannot verify whether your pkg file is notarized.
You can, however, ‘staple’ the notarization ticket to the pkg file, so the clients do not need to connect to the servers:
% xcrun stapler staple build/hello-1.0.pkg
You can also use stapler to verify the process went well:
% xcrun stapler validate build/hello-1.0.pkg
But since stapler depends on the developer tools to be installed, you should generally prefer spctl to check notarization:
Obviously, I built a script to automate all this. Put the following script in the root of the project folder, modify the variables at the start of the script (lines 20–38) with your information, and run it.
The script will build the tool, create a signed pkg, upload it for notarization, wait for the result, and then staple the pkg.
You can use this script as an external build tool target in Xcode. There are other ways to integrate scripts for automation in Xcode, but all of this is a new area for me and I am unsure which option is the best, and which I should recommend.
Links and Videos
These links and videos, especially Howard Oakley’s post and Tom Bridge’s PSU Presentation have been hugely helpful. Also thanks to co-worker Arnold for showing me this was even possible.
Notarization is a key part of Apple’s security strategy going in macOS.
As MacAdmins we will usually deploy software through management systems, where the Gatekeeper mechanisms which evaluate notarization are bypassed. There are, however, already special cases (Kernel Extensions) where notarization is mandatory. It is likely that Apple will continue to tighten these requirements in the future. The macOS Mojave 10.14.5 update has shown that Apple may not even wait for major releases to increase the requirements.
If you are building your own tools and software for macOS and plan to distribute the software to other computers, you should start signing and notarizing.
On the other hand, I find the introduction of Notarization to macOS encouraging. If Apple wanted to turn macOS into a “App Store only system” like iOS, they would not have needed to build the notarization process and infrastructure. Instead, Apple seems to have embraced third-party-software from outside the App Store.
Notarization allows Apple to provide a security mechanism for software distributed through other means. It cannot be 100% effective, but when used correctly by Apple and the software developers it will provide a level of validation and trust for software downloaded from the internet.
Simply said, ABI stability allows swift binaries to use a Swift library on the system instead of having to bundle the libraries with them. This will, of course reduce the size of the binaries.
For example, my desktoppr tool compiles to 6.5MB with Swift 4.2 and 56KB with Swift 5.
However, command line tools built with Xcode 10.2 now rely on the Swift library to be available on the system. macOS 10.14.4 and future versions will include the libraries, but older macOS versions did not. There is no option in Xcode 10.2 to keep the old behavior of bundling the libraries in the tool.
This means that when you re-build a tool in Xcode 10.2 with Swift it will not run on older macOS version:
$ sw_vers -productVersion
10.13.6
$ ./desktoppr
dyld: Library not loaded: @rpath/libswiftAppKit.dylib
  Referenced from: /Users/armin/Desktop/desktoppr
  Reason: image not found
Abort trap: 6
Note: these libraries are used by compiled binaries. Installing the runtime libriaries will not allow you to run swift script files, i.e. text files starting with the #!/usr/bin/swift shebang. You still need to install Xcode or the Developer Command Line tools for that.
So far, only command line tools written and compiled in Xcode 10.2 will require the libraries. Application bundles will continue to include their own libraries.
As Swift gets updated, you will need to update the installed libraries as well. You can get the installed version of the Runtime with pkgutil:
If/When Apple updates the runtime libraries, this might be a challenge to track and update properly.
Note: While I used my tool desktoppr as an example, I have not updated the version available for download to Swift 5 yet. So, that is still built with the “old” Swift and Xcode and should work everywhere without the runtime libraries.
Nevertheless, it should be prudent for MacAdmins to install the Swift 5 runtime libraries on their fleet. At the very least be aware that these errors can occur and how to fix them.
Right now the argument you are passing into the say command is fixed. It would be better to have a field where the user can enter arbitrary text that will be passed to the command.
In the file sidebar, select the ‘MainMenu.xib’ file and then move the ‘Talk’ button to the top right corner of the ‘SayThis’ window. As you move the button around the window blue lines will appear to guide you to the proper distances of the edges. Use these blue lines. Their alignments will help you later.
Use the blue guide lines to align the button in the top right corner
Next, use the object library in the lower right of the Xcode window to find a ‘Text Field’ object.
Object Library: search for text field
Drag the text field to your ‘SayThis’ window. Use the blue guide lines to align it in the top right corner and then extend it to the right until the blue lines show you it is right distance from the button.
Drag the right side until it snaps to the blue guide
You could now build the app and see the text field is there. You can even enter text. However, clicking the ‘Talk’ button will still only say “hello world” since you have not changed the code yet.
In your code you need to get the text from the text field. For that you need some reference to the text field object in the window. Create this ‘outlet’ the same way you hooked up the button action. First make sure you have a two part Xcode window. If you have closed the second pane, you can get it back by clicking the ‘Assistant Editor’ button in the top right window tool bar.
Just clicking this button shows or hides the second editor pane
And then choosing the ‘AppController’ file for the second pane.
Choose the AppController file
Then drag while holding the ctrl-key or with the secondary (right) mouse button from the text field to the code in the second pane. A blue line will appear to show the connection and a label ‘Insert Outlet or Action’ will show you what will happen and where. Let go of the drag below the line @IBOutlet weak var window: NSWindow!.
Ctrl or right drag from the UI to code to create connections
Then a small panel will appear asking for a name for the outlet connection. Enter sayThisTextField.
Enter the name, but leave everything else.
This will insert the following line of code:
@IBOutlet weak var sayThisTextField: NSTextField!
In code terms this is a property of the AppController class. The @IBOutlet label tells Xcode that this property can be connected to a UI element, same as the @IBAction for the talk method. But this does not only create the proper code in the class to declare the property. The xib file also stores the instructions that this property will be set with the proper reference when the application loads. Same as the window property above which was part of the default template. Either way you look at it, you can now use the sayThisTextField property to get data from the text field.
    @IBAction func talk(sender: NSButton) {
        let path = "/usr/bin/say"
        let textToSay = sayThisTextField.stringValue
        let arguments = [textToSay]
Leave the remainder of the method as it is.
Build and run the application, then enter some english text in the text field and click the ‘Talk’ button.
Make the Talk Button React to Return Key
If you are like me, you may have tried to hit the ‘return’ key to make the application say the text. It is a standard OS X behavior, that the return key activates the default button. But you need to configure our UI the right way for that to work. (Imagine a more complex application where there were more buttons. You need to tell the application which button is the default.)
To do this, select the ‘Talk’ button (1), then make sure the ‘Attributes Inspector’ tab is selected on the right side of the Xcode window (2). Among the button attributes is one called ‘Key Equivalent’. Select the field next to this label and hit the return key. It should show the return icon as the key equivalent and turn the ‘Talk’ button blue. Now you can just enter text and hit the return key to activate the ‘Talk’ button and thus our action.
Re-sizing the Window
When you build and run our application you can resize the window, but the text field and the button just stay where they are. This is not the right behavior. You can set re-sizing behavior in Xcode. Once again you need to ctrl or right drag from the object, but this time just drag towards the edge of the window which contains the object. The panel that pops up will then have options on how you want to ‘pin’ the object in the enclosing container.
In the movie, normal clicks are shown as black circles and ctrl or right clicks are shown as blue circles.
You need to drag from the talk button to the right margin and upper margin. Then from the text field to the upper margin and left margin. Finally drag from the text field to the button and fix that distance as well.
When you then rebuild, then button and text field will react as you expect. You can inspect and change or delete the constraints for an object by clicking on the ruler icon in the Inspector pane on the right of the Xcode window. You can also click the constraint lines in the interface directly but they are small and hard to hit with the mouse.
Size Inspektor shows constraints
Setting up the constraints manually is powerful, but tedious and error-prone. You can also let Xcode suggest constraints. To do this select an object and choose “Editor > Resolve Auto Layout Issues > Reset to Suggested Constraints” from the menu.
Reset to Suggested Constraints
This will use the blue guide lines as the default constraints which is why it is important that you use them when placing objects. You can choose to reset the constraints of the selected object(s) or all objects (views) in a window. This will overwrite all constraints you may have set manually!
The de-activation of the talk button from in the previous part still works. But it would be nice to have some indication that the system is working on something, especially on longer texts.
Use the object library to add an “Indeterminate Circular Progress Indicatior” to your window. Place it above the right end of the text field and use the “Reset to Suggested Constraints” menu to set up the re-sizing behavior. Then disable the “Display when Stopped” behavior in the attributes inspektor.
Add a Circular Indeterminate Progress Indicator
To give the progress indicator the instructions to start and stop the animation you need to hook it up to our AppController class. ctrl- or right-drag from the progress indicator to the AppController class to insert a new @IBOutlet and name it sayProgress.
Then change the talk action method like this: (add the two lines starting with sayProgress)
    @IBAction func talk(sender: NSButton) {
        let path = "/usr/bin/say"
        let textToSay = sayThisTextField.stringValue
        let arguments = [textToSay]

        sender.enabled = false
        sayProgress.startAnimation(self)

        let task = NSTask.launchedTaskWithLaunchPath(path, arguments: arguments)
        task.waitUntilExit()

        sender.enabled = true
        sayProgress.stopAnimation(self)
    }
The progress indicator object has actions named startAnimation and stopAnimation. So you can tell them to take that action. Just like your talk action method you have to pass one parameter indicating the sender. When using other objects’ actions you would usually give self to pass a reference to the calling object.
Note that you use the sender parameter to address the talk button. Since the talk button is the only UI element that can is hooked up to send the talk action this is safe to do. You can also hook up the talk button as an @IBOutlet and address it directly that way.
Note: in the Xcode split view you can hover over the grey circles next to the @IB... labels and Xcode will indicate the objects this action or outlet is hooked up to. If an outlet or action is not hooked up then the grey circle will be empty.
A Choice of Voices
The default OS X text to speech voice is called ‘Alex’, but there are many more. You can configure the avilable voices in the “Dictation & Speech” pane in System Preferences. When you click on the popup next to System Voice and then select “Customize” you can choose voices for different languages. Note that the download for the enhanced voices can be quite large.
The customize voices panel in the “Dictation & Speech” pane in System Preferences
You can also have the say command list available voices:
say -v ?
You can tell the say command to use a different voice with the -v option
say -v Allison "hello world"
To give the user an option to choose from a list of voices, search for “popup” in the Object Library and drag the normal Pop Up Button to your SayThis Window. Also search for “label” and drag a label next to it. Change the Label to show “Voice:” and align both with other items and the blue guides. Set the suggest constraints.
Add a Pop Up Button and a Label
Next create an @IBOutlet for the popup button, call it voicePopup.
Now, you can double click the popup button to edit its contents. There are three defaults and you can add more by dragging a “menu item” from the object library on to the popup button.
Popup Button with Voices
Then you need to add to the talk method to get the information from the popup button and pass it into the task.
    @IBAction func talk(sender: NSButton) {
        let path = "/usr/bin/say"
        let textToSay = sayThisTextField.stringValue

        var arguments = [textToSay]

        if let voice = voicePopup.titleOfSelectedItem {
            arguments += ["-v", voice]
        }

        sender.enabled = false
        sayProgress.startAnimation(self)

        let task = NSTask.launchedTaskWithLaunchPath(path, arguments: arguments)
        task.waitUntilExit()

        sender.enabled = true
        sayProgress.stopAnimation(self)
    }
First you have to change the arguments assignment to var, since you might change it later. Then you get the titleOfSelectedItem property from the voicePopup However, this is an ‘optional’, which means the value may be nothing. Swift requires you to deal with optional values, so you use a ‘conditional assignment’: if let voice =... This construct means “ if voicePopup.titleOfSelectedItemhas a value, assign it to voice and do the following”.
If there is a value from the popup, then append it to the arguments array. (Thankfully the say command does not care about order of the options.) Otherwise it adds no arguments and uses the default voice, which you set in System Preferences.
Save the Voice choice
Every time to quit and restart the app the setting on the voice popup reverts to the first item. There may be use cases where this is appropriate. However, often you want to store settings between application launches. The class to use for that called NSUserDefaults. However, this is such a common task, that you do not even need to write code. Select the popup button and then click on the square spiral icon to show the Bindings Inspector. Click the triangle next to ‘Selected Value’ to expose the settings for that. Check “Bind to” and make sure “Shared User Defaults Controller” is selected in this popup. Leave ‘values’ in the controller key field and enter ‘voice’ as the model key path.
With this configuration, the popup button to “binds” its selected value to the key ‘voice’ of the property ‘value’ of the ‘Shared User Defaults Controller’. This binding goes both ways, the popup button will read its initial state when starting the application from there and will write it back to there when the user changes it.
Re-build and launch the application, change the voice, quit and re-launch. The setting will persist.
But instead of com.scriptingosx.SayThis use the full bundle identifier you entered when creating the project in the first part. If you do not remember what you chose, you can select the blue ‘SayThis’ project icon in the left side file selector to see all you project information.
Then re-launch the application and it will have preset the popup to “Karen”.
The actual setting is stored in a property list file in ~/Library/Preferences/com.scriptingosx.SayThis.plist. However, it is not recommended to directly manipulate this file. The system caches preference files in memory and the file may be out of date or overwritten without your changes being read. If you access the data through the defaults command you will get the current status. If you need to reset the settings of your app for testing, you can use
This is a simple task but a nice project to find your way around Xcode and Swift. We will build a small Cocoa application in Xcode that executes a shell command on the click of a button.
For this example we will use the say command which use OS X’s text to speech to say a given text. You can try this by opening the Terminal and typing say "Hello world".
This tutorial is for Xcode 7.3 with OS X 10.11.4 El Capitan. It will probably not change too much with minor version changes, but no promises for major version differences.
All you need is a Mac with 10.11.4+ El Capitan and Xcode 7.3+ which you can download for free in the Mac App Store or Apple’s Developer page (free registration with any Apple ID required).
Creating the Project
Once you have downloaded and installed Xcode, launch it. It may prompt you for some extra installations and a password on first launch. Acknowledge those and you get to a splash screen with a few options. If you have used Xcode before it will list your previous projects. But for now, select “Create a new Xcode Project”.
On the next step Xcode suggests many templates to build your application from. Select “Application” under “OS X” and then the “Cocoa Application” icon. Then click next to continue.
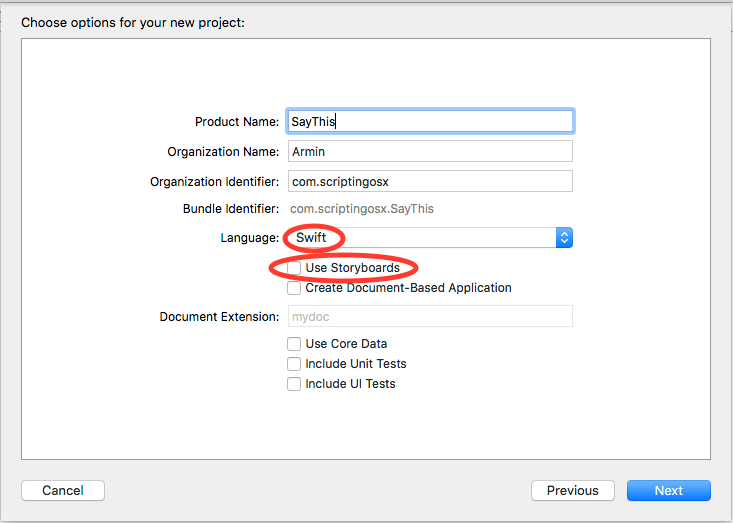
In the next step you will have to fill in some identification for your applications. For the “ProductName” or the name of the application enter “SayThis”. Fill your name or organization name into the next field. The identifier in the third field should follow a “reverse DNS schema” for your organization. It is ok to use more than two segments, like “com.example.department”. If you don’t really know what to put in here use your email or github account in reverse order, i.e. “com.gmail.username” or “com.github.username”.
For the language select Swift and disable “Use Storyboards” and every other checkbox here. Our first application is going to be very simple.
Finally, Xcode will ask you where to save the project. Xcode will create a folder named “SayThis” with all the necessary files. If you want, you can make the project folder a local git repository for version control.
Creating the Interface
The Xcode window has a navigation area or file selector on the left, a main editor area in the center and an utility or information panel on the right. There are buttons in top right toolbar to show and hide the left and right panels.
Right now the project itself is selected in the navigation area and the center editor shows various properties of the project. These were already set to useful defaults when the template was setup.
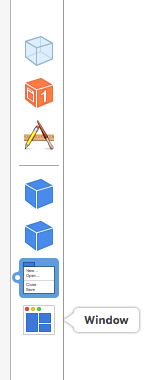
There are four files in this particular template. Select “MainMenu.xib”. xib files store how the interface looks like. The editor will change to a graphical area to design the interface. The application’s menu bar is at the top. However, there is no window to put an interface visible. There is a list of icons, next to the navigation bar, representing various objects in this xib file. The lowest is a window.
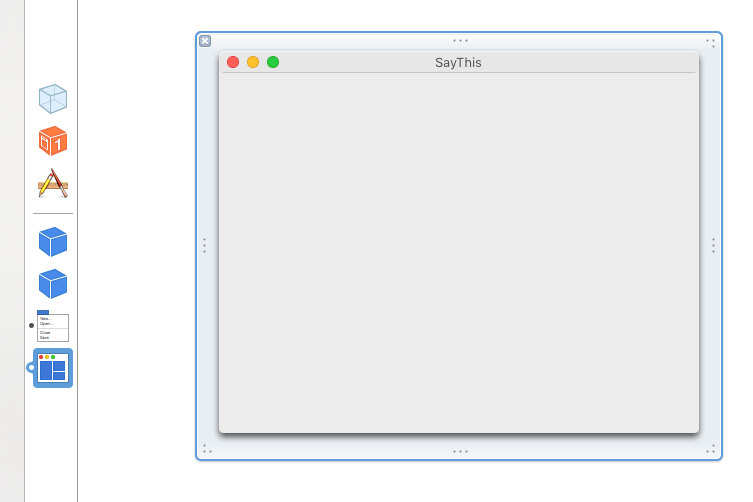
Click the icon to make the window visible in the editor area.
In the lower right corner of the Xcode window is a list of objects that can be added to the interface. You may have to select the circle icon with a square in it to see it. You can scroll through the list, but there are so many objects that it is easier to use the search field at the very bottom.
Enter ‘button’ in the search then drag the “Push Button” to your window. As you drag the button around the window, you will see blue lines appear, guiding the button to the right center line or the right distance from the edges of the window. Use the blue guide lines to drop the button in the center of the window.
You can double-click the text on the button to change the default label. Let’s use “Talk”. At this time you can already “Build and Run” the project. There is a “Play” triangle button in the upper right area of the window or you can choose “Run” from the project menu. Since this is the first time to build this project it will take a bit longer.
Xcode will launch the application after building and it should show the window with the “Talk” button. You can click the button, however aside from the standard click animation, nothing will happen, since we haven’t told the button to do anything yet.
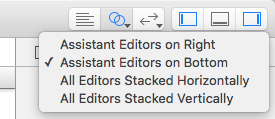
To connect the button to some action, we need to connect it to some code. We need to show the code and the UI side-by-side. There is a toolbar button on the right with two blue circles, click that and choose “Assistant Editors on Bottom” or “…on Right” (your choice) to open a second editor pane.
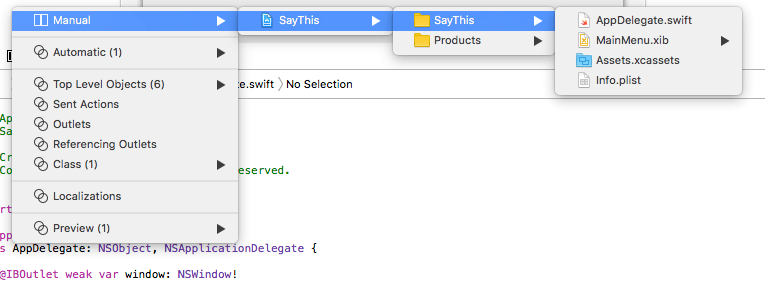
By default Xcode will show a header file we do not care about in the second panel. You can change this by clicking in the title bar of the second pane and selecting “Manual > SayThis > SayThis > AppDelegate.swift”
The template filled the AppDelegate.swift file with some code and one property that is connected to the window. We want perform an action method in the AppDelegate when the button it clicked. To make this connection hold the ctrl-key and drag from the button to the empty space in the AppDelegate below the two template function, but above the final closing brace }. When you end the drag there a small dialog will pop up asking for specific settings. Set it to be an action, name it talk and set the sender type to NSButton.
This inserts an empty action method into the AppDelegate class.
    @IBAction func talk(sender: NSButton) {
    }
The @IBAction is a label for the interface builder part of Xcode to know this function is available to connect to the UI. func designates this as a function, but since this is within the definition of the AppDelegate class it is actually a class method of AppDelegate. In the brackets we define one parameter, labelled sender of type NSButton. The curly braces enclose the function code which is still empty.
Insert the following code between the curly braces:
    @IBAction func talk(sender: NSButton) {
        let path = "/usr/bin/say"
        let arguments = ["hello world"]

        let task = NSTask.launchedTaskWithLaunchPath(path, arguments: arguments)
        task.waitUntilExit()
    }
While you are typing Xcode will suggest completions for the code that you are typing. This can be very helpful and helps you avoid typing errors. You can hit the tab-key to accept the suggestion.
The let statement is very particular to Swift and declares a variable as constant. The alternative label var would tell the compiler that we plan to change the content of the variable later. Choosing let and var properly will allow the compiler to optimize the resulting code. For example in this specific case, the compiler will use a non-mutable string and array class for our arguments, since they will not change later in the code.
If you replace let with var and build then the compiler will notice you are not modifying the variable and place a warning that you should use let instead.
Since the say command will not run within a shell and we cannot rely on environment variables being set, especially the PATH variable, we need to give the full path to the say command. To figure out the full path to a command you can use the which command in Terminal.
$ which say
/usr/bin/say
The arguments are passed as an array of Strings. Right now we have only a single static argument, but we could pass more, each option or argument will be its own String in the array. so if you wanted to use another voice you could extend the array to
let arguments = ["hello world", "-v", "Kathy"]
(One String per argument, no need to escape spaces.)
Finally we use the NSTask class to create and launch the command. Then the waitUntilExit() method of NSTask pauses code execution until the command finished.
There is a minor problem in the UI. If you hit the button quickly in succession, you will get multiple “hello worlds” on top of each other. One solution to that is to disable the button while the task is being processed. Alle interface elements have an enabled property we can use for that purpose. Change the talk method to this:
    @IBAction func talk(sender: NSButton) {
        let path = "/usr/bin/say"
        let arguments = ["hello world"]

        sender.enabled = false

        let task = NSTask.launchedTaskWithLaunchPath(path, arguments: arguments)
        task.waitUntilExit()

        sender.enabled = true
    }
Before we execute the task, we disable the button, then enable it later. Now, when you click the button it will be disabled while the task is running and be re-enabled afterwards.
Congratulations! You have built a simple OS X Application. In the next part, we will hook up a few more UI Elements to give the app some more functionality.