MacAdmin scripts often require passwords, mostly for interactions with APIs.
It is easiest to store the password in clear text, but that is obviously a terrible solution from a security perspective. You can pass the password as an argument to your script, but that is inconvenient and may still appear in clear text in the ps output or the shell history.
You can obfuscate the password with base64, but that is easily reversible. You can even try to encrypt the password, but since the script needs to be able to decrypt the password, you are just adding a layer of complexity to the problem.
macOS has a keychain, where the user can store passwords and allow applications and processes to retrieve them. We can have our script retrieve a password from a local keychain.
There are limitations to this approach:
the password item has to be created in the keychain
the user has to approve access to the password at least once
the keychain has to be unlocked when item is created and when the script runs—this usually requires the user to be logged in
the user and other scripts can find and read the password in the Keychain Access application or with the security tool
Because of these limitations, this approach is not useful for scripts that run without any user interaction, e.g. from a management system. Since the user can go and inspect the key in the Keychain Access is also not well suited for critical passwords and keys.
However, it is quite useful for workflow scripts that you run interactively on your Mac. This approach has the added benefit, that you do not have to remember to remove or anonymize any keys or passwords when you upload a script to GitHub or a similar service.
Since adding the password to your keychain is a one-time task, you can create the password manually.
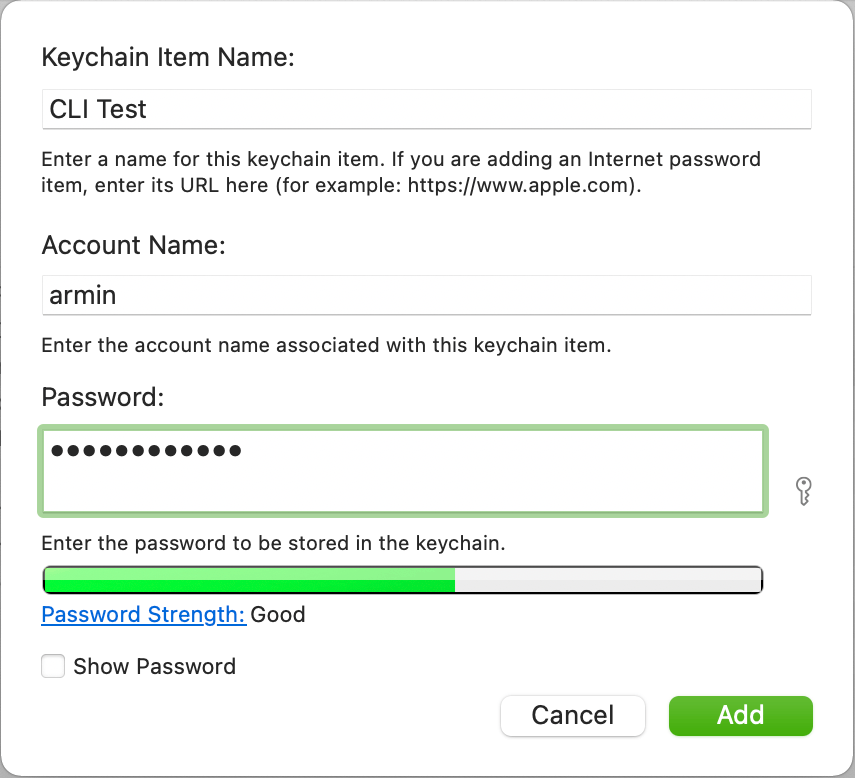
Open the Keychain Access application and choose “New Password Item…” from the Menu. Then enter the Keychain Item Name, Account Name and the password into the fields. The “Keychain Item Name” is what we are going to use later to retrieve the password, so watch that you are typing everything correctly.
You can also add the password from the command line with the security command.
> security add-generic-password -s 'CLI Test' -a 'armin' -w 'password123'
This will create an item in the Keychain with the name CLI Test and the account name armin and the horribly poor password password123.
How to Retrieve the Password in the Script
To retrieve a password from the keychain in a script, use the security command.
> security find-generic-password -w -s 'CLI Test' -a 'armin'
This will search for an item in the keychain with a name of CLI Test and an account name of armin. When it finds an item that matches the name and account it will print the password.
The first time you run this command, the system will prompt to allow access to this password. Enter your keychain password and click the ‘Always Allow’ button to approve the access.
This will grant the /usr/bin/security binary access to this password. You can see this in the Keychain Access application in the ‘Access Control’ tab for the item.
When you create the item with the security add-generic-password binary, you can add the -T /usr/bin/security option to immediately grant the security binary access.
Whether you grant access through the UI or with the command, keep in mind that a every other script that uses the security binary will also gain access to this password.
For very sensitive passwords, you can just click ‘Allow’ rather than ‘Always Allow.’ Then the script will prompt interactively for access every time. This is more secure, but also requires more user interaction.
Once you have tested that you can retrieve the password in the interactive shell, and you have granted access to the security binary, you can use command substitution in the script to get the password:
cli_password=$(security find-generic-password -w -s 'CLI Test' -a 'armin')
This command might fail for different reasons. The keychain could be locked, or the password cannot be found. (Because it was either changed, deleted or hasn’t been created yet.) You want to catch that error and exit the script when that happens:
pw_name="CLI Test"
pw_account="armin"

if ! cli_password=$(security find-generic-password -w -s "$pw_name" -a "$pw_account"); then
  echo "could not get password, error $?"
  exit 1
fi

echo "the password is $cli_password"
The session should be available “on demand” in the JNUC2020 portal within an hour or so. I believe all sessions will be available on YouTube eventually and will update the links then!
I hope you enjoyed the session, and if you have any more questions or comments, then I am @scriptingosx on the MacAdmins Slack and Twitter.
AppleScript on macOS is a useful tool for pro users and administrators alike. Even though it probably is not (and shouldn’t be) the first tool of choice for many tasks, there are some tasks that AppleScript makes very simple. Because of this it should be a part of your ‘MacAdmin Toolbelt.’
AppleScript’s strength lies in inter-application communication. With AppleEvents (or AppleScript commands) you can often retrieve valuable information from other applications that would be difficult or even impossible, to get any other way. With AppleScript, you may even be able to create and change data in the target applications.
If you are in any way security and privacy minded this should raise your hairs. Up to macOS 10.13 High Sierra, any non-sandboxed app could use AppleScript and AppleEvents to gather all kinds of personal and private data from various script-enabled apps and services. It could even use script-enabled apps like Mail to create and send email in your name.
Since macOS Mojave, the Security and Privacy controls restricts sending and receiving AppleEvents. A given process can only send events to a different process with user approval. Users can manage the inter-application approvals in the Privacy tab of the Security & Privacy preference pane.
MacAdmins have the option of pre-approving inter-application events with a PPPC (Privacy Preferences Policy Control) configuration profile that is pushed from a DEP-enrolled or user-approved MDM.
Privacy approval
You can trigger the security approval from Terminal when you send an event from the shell to another process with osascript:
> osascript -e 'tell application "Finder" to get POSIX path of ((target of Finder window 1) as alias)'
When you run this command from Terminal, you will likely get this prompt:
You will not get this prompt when you have approved or rejected the Terminal app to send events to this particular target application before. You can check the permissions granted by the user in the Automation section of Privacy tab in the Security & Privacy pane of System Preferences.
For any given source/target application combination, the prompt will only be shown once. When the user approves the privilege (“OK” button), future events will just be allowed.
When the user rejects the connection (“Don’t Allow” button), this event and future events will be rejected without further prompts. The osascript will fail and the AppleScript will return an error –1743.
> osascript -e 'tell application "Finder" to get POSIX path of ((target of Finder window 1) as alias)'
79:84: execution error: Not authorized to send Apple events to Finder. (-1743)
If you want to get the approval dialogs again, you can reset the state of the source application (Terminal) with the tccutil command:
> tccutil reset AppleEvents com.apple.Terminal
This will remove the Terminal application and all target applications for it from the Automation (AppleEvents) area in the Privacy pane and show dialogs for every new request going forward. This can be very useful during testing.
Dealing with rejection
You should write your code in a ways that it fails gracefully when access is not granted. in this case osascript will return an error:
if ! osascript -e ' tell app "Finder" to return POSIX path of ((target of Finder window 1) as alias)'
then
 echo "osascript encountered an error"
 exit 1
fi
However, osascript will return errors for all kind of failures with no easy way to distinguish between them. As an example, the above will also fail when there are no Finder windows open.
If you want to distinguish AppleScript errors, you need to do so in the the AppleScript code:
if ! osascript -s o <<EndOfScript
    tell application "Finder"
        try
            set c to (count of Finder windows)
        on error message number -1743
            error "Privacy settings prevent access to Finder"
        end try

        if c is 0 then
            return POSIX path of (desktop as alias)
        else
            return POSIX path of ((target of Finder window 1) as alias)
        end if
    end tell
EndOfScript
then
    echo "osascript failed"
fi
Note: the -s o option of osascript makes it print AppleScript errors to standard out rather than standard error, which can be useful to find the errors in logs of management systems.
Note 2: when you are running osascript from management and installation scripts (which run as the root user) you need to run them as the current user to avoid problems.
Avoiding Privacy prompts
So, we know of one way to deal with the privacy prompts. Ideally, you would want to avoid them entirely. While this is not always possible, there are a few strategies that can work.
Don’t send to other Processes
In past versions of Mac OS X (I use this name intentionally, it’s that long ago.), scripts that showed dialogs might not display on the highest window layer. In other words, the dialog was lost behind the currently active windows. To avoid “lost” dialogs, it became best practice to send the display dialog command (and similar) to a process that had just received an activate command as well:
tell application "Finder"
    activate
    display dialog "Hello, World!"
end tell
As an alternative for Finder, the System Events process is often used as well. Jamf MacAdmins often used “Self Service.” This had the added bonus, that the dialog looks as if it comes from the Finder or Self Service, including the bouncing dock icon.
Over time, even though the underlying problem with hidden dialog has been fixed, this practice has persisted. You often even see AppleScript code use this with commands other than user interaction, where it wouldn’t have made sense in the first place. With the privacy restrictions in macOS Mojave, this practice has become actively trouble some, as you are sending the display dialog (or other) command to a separate process. The process running this script will require approval to send events to “System Events.”
In current versions of macOS, you can just use display dialog and may other commands without an enclosing tell block. Since your AppleScript code isn’t sending events to another process, no privacy approval is provided. This code has the same effect as above, but does not trigger an approval request.
To determine whether an AppleScript command requires a tell block, you have to check where it is coming from. Many AppleScript commands that are useful to MacAdmins are contained in the ‘StandardAdditions’ scripting extension. Scripting extensions, as the name implies, extend the functionality of AppleScript without requiring their own process.
The useful commands in the Standard Additions extension include:
user interaction: choose file/folder/from list, display dialog/alert/notification
file commands: mount volume
clipboard commands: get the clipboard, set the clipboard to
sound control: set volume, get volume settings
system info
When your script uses only these commands, make sure they are not contained in tell blocks. This will avoid unnecessary prompts for access approval.
Exempt AppleScript commands
Some AppleScript commands are treated differently and will not trigger privacy approval:
activate: launch application and/or bring to front
open: open a file
open location: open a URL
quit: quit the application
For example, this will work without requiring approval:
osascript <<EndOfScript
    tell application "Firefox"
        open location "https://scriptingosx.com"
    end
EndOfScript
Use non-AppleScript alternatives
Sometimes, similar effects to an AppleScript can be achieved through other means. This can be difficult to figure out and implement.
As an example, I used this AppleScript command frequently for setup before Mojave:
tell application "Finder" to set desktop picture to POSIX file "/Library/Desktop Pictures/BoringBlueDesktop.png"
While Mojave was in the beta and it wasn’t really clear if or how the PPPC exemptions could be managed, I looked for a different means. I discovered Cocoa functions to read and change the desktop picture without triggering PPPC, and built a small command line tool out of that: desktoppr.
The downside of this approach is that you know have to install and/or manage a command line tool on the clients where you want to use it. There are different strategies for this, but it is extra effort compared to “just” running an AppleScript.
Build PPPC profiles to pre-approve AppleEvents
Even after you have considered the above options to avoid sending AppleEvents to another process, there will still be several situations where it is necessary. For situations where a MacAdmin needs to run a script on several dozens, hundreds, or even thousands of Macs, user-approval is simply not a feasible option.
MacAdmins can pre-approve AppleEvents (and most other privacy areas) between certain processes with a Privacy Preferences Policy Control (PPPC) configuration profile. PPPC profiles can only be managed when pushed from a user-approved or automatically enrolled MDM.
You can build such a profile manually, but it is much easier to use a tool to build these:
Your MDM solution might have a specific tool or web interface for this, consult the documentation or ask you vendor.
There is one big requirement here, though: only applications and tools that are signed with a valid Apple Developer ID can be pre-approved this way, as the signature is used to identify and verify the binary.
Determining the process that needs approval
While you can sign shell scripts and other scripts this is often not necessary. As we have seen earlier, when we ran our script from Terminal, it wasn’t the script that requested approval but the Terminal application. When your scripts run from a management system or another tool, it may not be easy to determine which process exactly needs approval.
The most practical approach to determine this, is to log the output of the ’Transparency, Consent, and Control” system (tcc) and look which process is sending the requests.
First, either use a clean test system, or reset the approvals for the processes that you suspect may be involved with tccutil.
Then open a separate Terminal window and run this command which will show a stream of log entries from the tcc process:
Then run the script in question, the way you are planning to run it during deployment. If you are planning to run the script from a management system, then do that right now. You will get a lot output in the stream above.
Even when you don’t have a good idea what the parent process is going to be, you can filter the output for osascript since this is usually the intermediary tool used.
In my example I found several entries similar to this:
The important information here is the responsible path which give me the binary and the enclosing application that tcc considers ‘responsible.’ This is the application you need to approve.
When you are running your scripts from a management system, your MDM vendor/provider should already have documentation for this, to save you all this hassle.
With all this information, you can build the PPPC profile with one of the above tools, upload it to your MDM and push it to the clients before the deployment scripts run.
Conclusion
While the added privacy around AppleEvents is welcome, it does add several hurdles to automated administration workflows.
There are some strategies you can use to avoid AppleScripts triggering the privacy controls. When these are not sufficient, you have to build a PPPC profile to pre-approve the parent process.
Versioning software is a surprisingly difficult task. The version number conveys technical information: how much change can you expect and might it break existing workflows and data? Users will be more willing to pay for a major upgrade with new features, so the version number is used as a marketing tool. But for developers and MacAdmins, the version number has to be as granular as possible, ideally with a different number for each build made.
Because of these, sometimes opposing, interests, it is no wonder that versioning is often a problem for MacAdmins.
A brief history of the Mac operating system versions
Before the “Mac OS” label, the Macintosh operating system was called “System 7.” “Mac OS 8”, code-named “Copland,” was supposed to be the new operating system with all the new features, but the project kept slipping and then was cancelled. The “System 7.7” update was then re-named “Mac OS 8” to get Apple out of some third party licensing deals, which were set to expire on version 8. Marketing and legal matters decided the versioning here. (But it wasn’t all just marketing: Mac OS 8 also got the new interface design that had been created for Copland.)
When Apple announced the NextSTEP based major overhaul for the Macintosh in the late nineties, they chose to not give it a different name and new version numbers. Instead they chose to label the new system as “Mac OS X”, where the “X” was read as the roman numeral ten. I assume this was a marketing choice to demonstrate continuity with the previous versions, which had been “Mac OS 8” and “Mac OS 9.”
The first version of Mac OS X had the numerical version number 10.0.0 and got four “updates” to 10.0.4 Then it got the first major “upgrade” to 10.1. This broke with conventional versioning as major upgrades should get a new major number. When “Mac OS X 10.2 Jaguar” was announced at WWDC in 2002, it was obvious that Apple now considered “Mac OS X” a brand and would stick to the 10 in the system version numbers.
With the “Xserve,” the ‘X’ became a moniker to represent Apple’s “professional” or “EXpert” hardware and distinguish them from the ‘i’ prefix used for the consumer friendly devices and software. (iMac, iBook, iPod, iTunes, iMovie, iPhoto, etc.) Later “pro” software tools, such as “Xcode,” “Xsan,” and “Xgrid” picked up that prefix. Confusingly, the leading “X” was pronounced ‘ecks’ and the trailing ‘X’ in “Mac OS X” was still pronounced as ‘ten.’ Or at least that was what Apple marketing insisted it should be called.
In 2012, Apple dropped the “Mac” from the operating system for “OS X Mountain Lion” (10.8) The “X” represented the “pro” nature of Mac platform, as opposed to “iOS” for iPhone and iPad. Apparently, the “X” was considered a stronger brand for “pro” than “Mac” at the time…
This changed when Apple finally dropped the “X-as-ten” and returned the “Mac” with “macOS Sierra” (10.12) in 2016.
Even without the “X” in the system name, the ‘10’ has remained in the version number up to macOS 10.15 Catalina.
(The “X-as-ten” lives on with “Final Cut Pro X” and “Logic Pro X”. The prefix “X” lives on with “Xcode.”)
Big Sur goes to 11
The naming and versioning of the Mac platforms operating system was largely driven by symbolism, marketing and even legal matters. The same is true this year: Apple has finally given up on the “ten” and will raise the major version of macOS to 11.
When you go to “About this Mac” on a Mac running the Big Sur beta, it will proudly announce that it is running macOS 11.0. You get the same result when you run sw_vers:
% sw_vers -productVersion
11.0
This seems easy enough, however, there is a catch to this.
10.16 vs 11.0
Big Sur will not always report 11.0 as the macOS version. It might report 10.16 in some cases. These cases are meant for situations where software might just check the second part of the version for version checks.
When you have a script that checked the version of macOS (or Mac OS X or OS X), so far it was safe to ignore the first number of the product version and only compare the second. For example to see if macOS was Mojave or newer, you probably would have done something like this:
minorVersion=$(sw_vers -productVersion | awk -F. '{ print $2; }')
if [[ $minorVersion -ge 14 ]]; then
  echo "Mojave or higher"
fi
Now, with the release of macOS 11.0, this setup will return 0 for the minorVersion and fail.
The obvious solution here would be to extract the majorVersion as well and compare that first:
majorVersion=$(sw_vers -productVersion | awk -F. '{ print $1; }')
minorVersion=$(sw_vers -productVersion | awk -F. '{ print $2; }')
if [[ $majorVersion -ge 11 || $minorVersion -ge 14 ]]; then
  echo "Mojave or higher"
fi
This will work well enough, even when the script runs in a setup where it might get 10.16 as the version number. But is not particularly nice to read. Also, when you want to compare update versions, these will be (presumably) the minorVersion for Big Sur and later and the third part of the version number in Catalina and earlier and things will get even more messy quickly.
Maybe there is a better way of doing this than using the product (marketing) version of macOS?
Build Version
As I mentioned earlier, the user visible version may not be granular enough for the needs of developers. And because of this macOS has a second version, called the “build version”
The build version for the current version of macOS Catalina as I am writing this is 19G2021.
> sw_vers -buildVersion
19G2021
You can also see the build version in the “About this Mac” window when you click on the version number.
The build version consists of three parts and a fourth optional one. The first number is the Darwin Version. The following capital letter designates the update. The following number (up to four digits) is the specific build number. Sometimes the build number is followed by a lower case letter.
The Darwin Version is number that is increased on every major release of macOS. Mac OS X 10.2 Jaguar was the first release of Mac OS X to consistently report its Darwin Version as 6. From that you can conclude that 10.0 had Darwin version 4 which makes sense, because it was the fourth release of NextSTEP, the operating system Mac OS X is based on.
macOS 10.15 Catalina, has a Darwin version of 19 and Big Sur reports 20.
You can also get the Darwin version in the shell from the OSTYPE environment variable:
> echo $OSTYPE
darwin19.0
But keep in mind that environment variable may not be set depending on the context your script runs in.
A safer way to get the Darwin version is with the uname command:
> uname -r
19.6.0
This Darwin version includes the update information.
Updates
In the build version updates are tracked with a capital letter. The letter A stands for the .0 or first release of a major version. B signifies the second release or first update or .1 release, and so on.
The current Catalina build version starts with 19G so we know it is the seventh release or sixth update to Catalina (10.15.6). The current Big Sur beta starts with 20A so it is the first release or .0 version.
Build numbers
The significance of the build number is most often seen during the beta phase. While the Darwin version and update letter are fixed during the beta phase, the build number increases with every beta release. This is the most granular number we have to determine the version.
For each update and major release the build number starts over, so it can only be used to compare releases for the same major release and update version.
Traditionally, there was a difference between two- and three-digit build numbers and four-digit build numbers. The builds with lower numbers of digits were general release builds, that will run on all Macs that support this version of macOS. The four digit build numbers designated either a security update or a hardware specific build.
Hardware specific builds occur when a new Mac model is released. These usually get a hardware specific build of macOS, since the drivers necessary for the new hardware are not included in the current general release version. Even though the product version numbers of macOS are the same for the general release and the hardware specific release, they have different build numbers.
Usually, the hardware specific drivers are merged into the general release on the next update. However, until the builds are merged, MacAdmins may have to manage hardware specific system installers and workflows for new hardware. This was especially annoying with the release of the 2018 MacBook Pro which had a specific build of 10.13.6 that was never merged into the general 10.13 build. MacAdmins that wanted or needed to support 10.13 had to manage a separate installer for these MacBooks.
Intruigingly, the Big Sur beta is different: its build number started in the 4000s and switched to the 5000s with beta 3.
Special builds
Some releases of macOS have a trailing lower case letter after the build number. This is particularly common during the beta phase. It is unclear what this letter designates exactly. It might designate that the installer application was re-built one or more times.
You can use regular expressions to parse out all the individual pieces of the build version:
if [[ $buildVersion =~ ([[:digit:]]{1,2})([[:upper:]])([[:digit:]]+)(.*) ]]; then
    darwinVersion=$match[1]
    updateLetter=$match[2]
    buildNumber=$match[3]
    specialBuild=$match[4]
else
    echo "couldn't parse build version"
    exit 2
fi
But in most cases, you will not need this level of detail.
Using the Build Version
The build version provides a way to compare macOS system versions that is not subject to the whims of marketing. We can even use it distinguish hardware specific builds of macOS from general versions or determine if security or supplemental updates have been applied.
For most comparisons, we only need the Darwin version and maybe the update.
The Darwin version has had two digits since Mac OS X 10.6 Snow Leopard. It is safe to assume that you won’t be managing Macs running 10.5 Leopard any more. (And if you do, they will probably be “hand-fed” and not subject to your deployment and update automations.) Assuming a two digit Darwin version, we can use string comparison to compare build versions:
# check if Mojave or higher
if [[ $(sw_vers -buildVersion) > "18" ]]; then
...
Since all versions of Mojave start with 18A... they are all alphabetically greater than 18. The same would go if you want to check for a maximum macOS version:
# check if Mojave or earlier
if [[ $(sw_vers -buildVersion) < "19" ]]; then
...
You can also filter for specific minimum updates:
# check if Mojave 10.14.6 or later
if [[ $(sw_vers -buildVersion) > "18E” ]]; then
...
By using the build version, we are avoiding all the trouble that the “marketing-driven” build version brings with it.
When you use zsh in the Terminal interactively, it is probably already loaded, but when you want to use it in scripts, you should use autoload to make sure it is loaded. Then you can use is-at-least this way:
autoload is-at-least
# check for Mojave or higher
if is-at-least 10.14 $(sw_vers -productVersion); then
...
Since both 11.0 and 10.16 are higher than 10.14 this will work no matter what number Big Sur might be reporting, but if you want to check that the system is Big Sur, you want to use 10.16 as the minimum, which covers both possible values:
autoload is-at-least
# check for Big Sur or higher
if is-at-least 10.16 $(sw_vers -productVersion); then
...
Conclusion
The change of the version number in macOS 11 Big Sur might affect or even break some of your system version checking in your deployment and management scripts. There are some nice and easy solutions that are more resilient to changes in the “marketing” product version.
This post is an update to an older post on the same topic. macOS has changed and I had a few things to add. Rather than keep modifying the older post, I decided to make this new one.
As MacAdmins, most of the scripts we write will use tools that require administrator or super user/root privileges. The good news here that many of the management tools we can use to run scripts on clients already run with root privileges. The pre– and postinstall scripts in installation packages (pkgs), the agent for your management system, and scripts executed as LaunchDaemons all run with root privileges.
However, some commands need to be run not as root, but as the user.
For example, the defaults command can be used to read or set a specific setting for a user. When your script, executed by your management system, is running as root and contains this command:
defaults write com.apple.dock orientation left
Then it will write this preference into root’s home directory in /var/root/Library/Preferences/com.apple.dock.plist. This is probably not what you intended to do.
Get the Current User
To get the correct behavior, you need to run the command as a user. Then the problem is as which user you want to run as. In many cases the answer is the user that is currently logged in.
I have written a few posts about how to determine the currently logged in user from shell scripts and will use the solution from those:
This will return the currently logged in user or loginwindow when there is none. This is the Posix sh compatible syntax, which will also run with bash or zsh.
Running as User
There are two ways to run a command as the current user. The first is with sudo:
sudo -u "$currentUser" defaults write com.apple.dock orientation left
The launchctl command uses the numerical user ID instead of the user’s shortname so we need generate that first.
It used to be that the sudo solution would not work in all contexts, but the launchctl asuser solution would. This changed at some point during the Mojave release time.
Now, the lauchctl asuser works and is required when you want to load and unload LaunchAgents (which run as the user), but it does not seem to work in other contexts any more.
So, for most use cases, you want to use the sudo solution but in some you need the launchctl form. The good news here is, that you can play it safe and use both at the same time:
This works for all commands in all contexts. This is, however, a lot to type and memorize. I built a small shell function that I use in many of my scripts. Paste this at the beginning of your scripts:
# convenience function to run a command as the current user
# usage:
#   runAsUser command arguments...
runAsUser() {
  if [ "$currentUser" != "loginwindow" ]; then
    launchctl asuser "$uid" sudo -u "$currentUser" "$@"
  else
    echo "no user logged in"
    # uncomment the exit command
    # to make the function exit with an error when no user is logged in
    # exit 1
  fi
}
and then you can use the function like this:
runAsUser defaults write com.apple.dock orientation left

runAsUser launchctl load com.example.agent
Note: the function, as written above, will simply do nothing when the Mac is sitting at the login window with no user logged in. You can uncomment the exit 1 line to make the script exit with an error in that case. In your script, you should generally check whether a user is logged in and handle that situation before you use the runAsUser function. For example you could use:
if [ -z "$currentUser" -o "$currentUser" = "loginwindow" ]; then
  echo "no user logged in, cannot proceed"
  exit 1
fi
Insert this at the beginning of your code (but after the declaration of the currentUser variable) and you can assume that a user is logged in and safely use the $currentUser variable and the runAsUser function afterwards. The exact detail on when and how you should check for a logged in user depends on the workflow of your script. In general, earlier is better.
When to Run as User
Generally, you should run as the user when the command interacts with the user interface, user processes and applications, or user data. As MacAdmins these are common commands you should run as the user;
defaults, when reading or changing a user’s preferences
osascript
open
launchctl load|unload for Launch Agents (not Launch Daemons)
This is not a complete list. Third party configuration scripts may need to be run as root or user. You will need to refer to documentation or, in many cases, just determine the correct action by trial and error.
Sample Script
I have put together a script that combines the above code into a working example.
It’s been more than a month since the last update, and while there has been work on the dev branch, I was quite distracted with other things (like this). The good news is, that there have been quite a few contributions from others! A huge thanks to all who helped make this a better script.
All it took was for me to find some time to put all the contributions together, which I finally found some time for.
What’s new in v0.3:
added several new labels for total of 98
removed the powershell labels, since the installer is not notarized
when run without any arguments, the script now lists all labels
changed how zips are expanded because this was broken on Mojave
improved logging in some statements
several more minor improvements
Get the script and find the instructions on the GitHub repo.
Some of the contributions and requests have not yet been addressed. I believe they will require some more thinking and planning. I would like to approach those in the next version.
If you have any feedback or questions, please join us in the #installomator channel on MacAdmins Slack.
This is an excerpt from my book: “Moving to zsh.” At the MacAdmins Conference Campfire session I received quite a few questions regarding this, so I thought it would be helpful information. You can get a lot more detailed information on “Moving to zsh” in the book!
Calls to the POSIX sh /bin/sh in macOS are handled by /bin/bash in sh compatibility mode. You can verify this by asking sh for its version:
% sh --version
GNU bash, version 3.2.57(1)-release (x86_64-apple-darwin19)
Copyright (C) 2007 Free Software Foundation, Inc.
If Apple plans to eventually remove the bash binary, they need to have a replacement which handles sh.
Enter dash
Probably not coincidentally, Apple added the dash shell in Catalina. The Debian Almquist Shell (dash) is a minimal implementation of the Posix sh standard and commonly used on other UNIX and Unix-like systems as a stand-in for sh.
Apple also added dash (but not zsh) to the Recovery system in macOS Catalina. While sh is still interpreted by bash in both the Recovery system and the regular system, this is a strong indicator that Apple eventually wants to use dash as the interpreter for sh scripts.
When your scripts which use the #!/bin/sh shebang strictly follow the POSIX sh standard, you should experience no problems when Apple switches to ‘dash-as-sh.’
Tripping over bashisms
However, there are some quirks of the current ‘bash-as-sh’ implementation in macOS that you need to be aware of. When bash stands in as sh, it will nevertheless continue to interpret ’bashisms’—language features available in bash but not sh—without errors.
For example, consider the following script shtest.sh:
#!/bin/sh

if [[ $(true) == $(true) ]]; then
  echo "still good"
else
  echo "nothing is true"
fi
This script declares the #!/bin/sh shebang and it will work fine on macOS with bash-as-sh.
% shtest.sh
still good
However, when you try to run it with zsh-as-sh or dash-as-sh, it will fail.
You can make dash interpret the script instead of bash by switching the shebang to #!/bin/dash. But macOS Catalina has another, new mechanism available. In Catalina, the symbolic link at /var/select/sh determines which shell stands in as sh. By default the link points to /bin/bash:
% readlink /var/select/sh
/bin/bash
When you change this link to either /bin/zsh or /bin/dash, the respective other shell binary will stand in as sh.
Switch the sh stand-in to dash with:
% sudo ln -sf /bin/dash /var/select/sh
And then run the script again:
% ./shtest.sh
./shtest.sh: 3 ./shtest.sh: [[: not found
nothing is true
When interpreted with dash instead of bash, the same script will fail. This is because dash is much stricter than bash in following the sh standard. Since dash is designed as a minimal implementation of the sh standard, it has to be stricter. The double brackets [[ … ]] are a ‘bashism,’ or a feature only available in bash and other, later shells such as ksh and zsh.
Even though zsh also interprets most of these bashisms, zsh in sh compatibility mode is also stricter than bash and will error.
You can switch back to the default bash-as-sh with:
% sudo ln -sf /bin/bash /var/select/sh
Since macOS has been using bash-as-sh for a long time, there may be many such bashisms lurking in your sh scripts. You can change the above symbolic link to test your scripts with dash-as-sh.
Some common ‘bashisms’ are:
double square brackets [[ ... ]]
here documents and strings (<<< and << operators)
double equals operator == for tests
Shellcheck to the rescue
You can also use the shellcheck tool to detect bashisms in your sh scripts:
% shellcheck shtest.sh

In shtest.sh line 3:
if [[ $(true) == $(true) ]]; then
   ^----------------------^ SC2039: In POSIX sh, [[ ]] is undefined.

For more information:
  https://www.shellcheck.net/wiki/SC2039 -- In POSIX sh, [[ ]] is undefined.
When you change the double square brackets for single square brackets, then you get this:
% shellcheck shtest.sh

In shtest.sh line 3:
if [ "$(true)" == "$(true)" ]; then
               ^-- SC2039: In POSIX sh, == in place of = is undefined.

For more information:
  https://www.shellcheck.net/wiki/SC2039 -- In POSIX sh, == in place of = is undefined.
In Catalina Apple started warning us about the eventual demise of bash from macOS. Converting your existing bash scripts and workflows to zsh, sh, or bash v5 is an important first step. But you also need to consider that the behavior of sh scripts will change when Apple replaces the sh interpreter.
Since I built the script, you’d think I’d have pretty good idea on how it should be deployed. But then Mischa van der Bent showed me a better way of using Installomater with Jamf Pro and I asked him to write it up for a blog post. Since he doesn’t have a blog of his own (yet), he has allowed me to post his instructions here.
Note: Installomator is designed so it can work with other management systems, too. If you have implemented Installomator with a different management system, let me know!
Everything that follows is from Mischa:
Preparation
After you have downloaded or cloned Installomator from Github, you can run Installomator.sh from the command line or from your management system:
The first thing we need to do is create a new Script in Jamf by going to Settings > Computer Management > Scripts.
In the General section you can give the Script a Display Name. I called mine Installomator. Assign a category and add the link to the GitHub repository to the notes as a reminder of the source of this script.
In the Script section, paste the entire code from the Installomator.sh file.
Important: Change the DEBUG variable from 1 to 0 for using Installomator in procduction, otherwise it will not actually install the new software.
The script requires a single argument and designed to use argument 4 from Jamf when present.
We can set the Parameter Label of parameter 4 to “Application name” in the Options section. This is going to be a reminder that we need to fill in the argument when we are creating a policy. You can leave the labels for the other parameters empty or fill in “DONT-USE” because the script does not use the other arguments.
We are done here and you can save the Script.
Scoping
To make sure that we are targeting to the right devices with an older release version we need to create a couple of things.
I’m going to use Jamf Patch Management to determine the latest release version of Google Chrome. Jamf will check the version before publishing this into the Patch Management. And if the software title is not in Jamf default Patch Management list you can create your own Patch Management source and add this on to Jamf Pro. You can also join the community patch server.
Go to Patch Management under Computers > Content Management and create a New Software Title. We are going to use Jamf Repository. Scroll down the list and select Google Chrome.
The only thing we need to set here is the Software Title Settings and assign a Category. You can select the Jamf Pro Notification option to get emails when an update is posted..
Jamf Patch Management will query the inventory and list the clients where Google Chrome is installed and their versions. We now have the all the information we need!
Two Smart Computer Groups
Go to Smart Computer Groups and create a new one. I called this “Google Chrome not installed or out of date”
In the ‘Criteria’ section I add two criteria:
Patch Reporting Software Title: after choosing this select the right report; for our example select “Patch Reporting: Google Chrome”
change the ‘Operator’ to “Less than” with the ‘Value’ “Latest Version.”
add a second line and Changed the AND/OR to “or” and for the second criteria I used “Application Title”
change the ‘Operator’ to “does not have” with the ‘Value’ “Google Chrome.app”
This Smart Group will contain the clients where the application is not installed or is not up to date.
Unfortunately, we cannot use this smart group with a Policy. When you try you will get this error ‘Policy scope cannot be based on a smart computer group that uses the “latest version” criteria.’
But there is a work around:
create a second Smart Group, I called this one “Member of Google Chrome not installed or out of date”
in the ‘Criteria’ section add the criteria “Computer Group” changed the ‘Operator’ to “member of” with the ‘Value’ to “Google Chrome not installed or out of date”
The result is the same as the Smart Computer Group “Google Chrome not installed or out of date” but we can use this in a policy.
Policy
Let’s put all the bits and pieces together and create one policy that will install or update to the latest release version of Google Chrome. We also want to promote this in Self Service and we want to push this out as a mandatory update with a deferral duration of 7 days.
go to Policies and create a new one. I called this policy “Google Chrome”
use “Recurring Check-in as the trigger, and set the custom event value to ”googlechrome.” With the custom trigger name, we can use this policy in a script or can test with the terminal command sudo jamf policy -event googlechrome -verbose
set the ‘Execution Frequency’ to On-Going.
add the Installomator script to the payload
the Priority doesn’t matter, because there is no package, so leave it default ‘After’
in the Parameter values you see that the first one is ‘Application name’ (which we set earlier). Set “googlechrome” as value.
I removed the payload “Restart Options” because we don’t need to restart after we install Google Chrome , we can leave it there, but I like to keep my policies clean.
We need to report back to the Jamf Pro Server that we just installed the latest version so we are going to add the payload “Maintenance” and enable “Update Inventory” (this should be enabled by default).
We are done with the payload and need to set the Scope:
under target we add the Smart Computer Group: “Member of Google Chrome not installed or out of date”
Self Service
enable “Make the policy available in Self Service”
leave the Display Name the same as Policy.
Button Name Before Installation: use “Install”
Button Name After Installation: use “Update”
give a Description to display for the policy in Self Service like “Install or Update to the latest release of Google Chrome”
upload or select the Google Chrome icon for making the Self Service pretty (you can use the macOS Icon Generator app)
under User Interaction we change the Deferral Type to “Duration” and use 7 days.
we don’t need to set a Start or Complete Message (Installomator can notify on success)
Now, we can save and test the policy.
Testing
I tested this Policy with a couple of scenarios;
The first scenario is: no Google Chrome installed. Second: old version Google Chrome installed, notification for update, end user deferral, and later installation from the Self Service. Third: Google Chrome Beta is installed
The first scenario is easy, after running the policy latest version get installed.
In the second scenario I got prompted with the following message, and I submitted 1 hour.
I can’t install this update before the hour because I got this message in the jamf log “Policy ‘Google Chrome’ will not be executed because it was deferred by the user.”
The last scenario I installed the Google Chrome Beta version 84.0.4147.30, the latest version in Patch Management (for this moment) is 83.0.4103.61. This beta version registers as an “Unknown Version” and it will not fall into scope.
I can use this policy with the Installomator script to install the latest version on a clean machine, and I can push out an update (with a deferral time) to push a mandatory update in a polite way 😉
Because Installomator is checking the Developer Team ID of Google directly, I can be confident that it is the real installer from Google. So, we get security with less effort.
As a System Engineer at an Enterprise Reseller, I have to manage and create many Jamf Pro instances.
Some of them are tightly managed and require version control on the OS and the apps. But, many of them are managed less stringently and often the requirement for applications is “install the latest version.”
This is not a statement which management strategy is ‘better.’ There are pros and cons for each. There are situations where either is really not appropriate. You will likely have to use a mixed approach for different pieces of software. When you are doing the first, more controlled deployment strategy, you really want to use AutoPkg and not this script. You can stop reading here.
Apple’s vision of deployment with ‘Automated App Installation’ through MDM (formerly known as VPP) is similar to the ‘less controlled’ strategy. When you install Mac App Store through MDM commands, then you will get the latest version available.
Not all applications are available on the Mac App Store. And even when they are available, installing applications with VPP is still unreliable and hard to debug, or retry when it fails.
If you are managing with the “just install the latest version” philosophy, then you probably have one or more scripts that will download and install the latest version of some software from the vendor’s website. This avoids the overhead work of having to download, repackage and manage every new update in the management system. (This can be automated with AutoPkg, but if you can avoid it entirely…)
When I started thinking about this, we had at least four different scripts. Most of them were internal, but William Smith’s installer script for Microsoft applications was a huge inspiration. it made me thing that you could generalize much of this.
Security Considerations
The main danger when downloading application archives and installers directly from the vendor is that a malicious actor might intercept the traffic or even hijack the servers and replace the download with a manipulated software that contains and or installs malware. Since management processes run with root privileges, we have to extra careful which files and processes are installed.
For user driven installation, Apple introduced GateKeeper, signed applications and Notarization as a way to verify downloaded software before execution. When you download software with a script, then you are bypassing GateKeeper. This is usually considered a benefit, because in a managed deployment we don’t want to scare and annoy a user with the warning dialogs.
But we can use the GateKeeper verification process in our script to verify that the archive, application, or installer is signed and notarized. With the spctl command, we can run the verification from the script without the user interaction.
We can even go one step further than GateKeeper. GateKeeper is happy when a software is signed and notarized with any Apple Developer ID. Since this script is working with a curated list of software, we can verify that the application is actually signed with the expected vendor’s Developer ID.
This will catch situations where someone creates or steals a Developer ID to sign and notarize a manipulated application. Apple can and will eventually block that Developer ID, but there will be a window where the manipulated application may be downloaded and installed. This is not theoretical, but has happened already. (more than once)
Installomator
With these ideas in mind, I started working on a script to unify all these installer scripts. (‘The one to rule them all.’) I may have gone a little overboard, but it turned into Installomator.
You can run Installomator from the command line or from your management system.
> ./Installomator.sh desktoppr
The script requires a single argument. The argument is a label that chooses which application to download and install. (As of now, Installomator can handle 56 applications, you can see a list of applications in the repository.
I have tried to keep Installomator generic enough that it can be used with platforms other than Jamf Pro.
However, we will use it with Jamf Pro, and thus I took the opportunity to add some workflows that Jamf is missing.
Drag’n Drop installations
“Drag this app to the Applications folder” is a common instruction found on downloaded dmg or zip archives for the Mac. The fact that Jamf Pro has always required repackaging and cannot directly handle application dmgs or zips is mystifying. Also, highly ironic, since Jamf delivers their own management applications in a disk image.
Nevertheless, Installomator can deal with apps that are downloaded in zip, tbz, and dmg archives.
Blocking Processes
Jamf will also happily attempt to install over a running application. So, Installomator will check for blocking processes and either stop the installation at that time or prompt the user and give them a chance to quit the application. (Yes, this is inspired by the behavior of Munki.)
Vendor update processes
Since Installomator will download and install the latest version of the application from the vendor website, it can be used for updates as well as first installations.
If an application has a built-in update process that can be triggered by the script, This can be used instead for updates. So, for Microsoft applications, when the script detects that the app is already installed, it will run msupdate instead of downloading a full installer. This way the update process will use Microsoft’s optimized thin updates. (Credit to Isaac Ordonez, Mann consulting for the idea and first implementation.)
So far, this is only implemented for Microsoft applications and Google Chrome. (and quite experimental)
Extensible
So far, the script can install 56 different applications or application suites. More application descriptions can be added fairly easily, by adding the proper variables. You can find more detailed explanations in the ReadMe, and of course, the existing applications serve as examples.
Not all applications are suitable to be installed with Installomator. To be able to install an application, the download URL must be accessible without requiring a login, and there must be some, fairly simple process to determine the URL for the latest version.
Installomator will only install the application itself, it will not configure any settings. You will have to use profiles, or additional scripts and installers for that.
When you add an application for your own workflow, please contribute as an issue or pull request! Thank you!
Installomator and AutoPkg
Obviously, much of Installomator’s workflow has been heavily inspired by AutoPkg. I have been using AutoPkg for a long time and provide a repository of recipes. And I plan to continue to use AutoPkg.
As mentioned before, Installomator is not suitable for every type of deployment. If you require control over the versions of the software deployed, then you need to download, re-package and manage the packages in your management system. This is obviously what AutoPkg was designed for.
Also, not every software can be installed with Installomator, mostly because the installer is not available as a direct download. In these cases, AutoPkg will be useful to automate the management and deployment, even when you management style is less controlling.
Going Forward
We have been using Installomator for the past few weeks in our own deployment and with one customer. We are now at a point, where we believe it is stable enough to share it and get feedback from other MacAdmins. (I have already shared it with a few, and many thanks to those that have given valuable feedback.)
We have been using this script with two smaller deployments and want to roll it out to more of our customers. But we probably haven’t hit all the weird edge cases yet. So, proceed with caution.
Consider this a beta release.
(Sidenote: I have tested the script with 10.14.6 and 10.15.x. Because it uses the notarization verification which is available in 10.14.4 and higher it will probably not run well on older macOS versions. Might be possible to adapt it though.)
If you are as excited about the script as we are, please start testing in your environment and provide feedback. But please, as with anything MacAdmin, don’t just go and push the script to hundreds or thousands of devices, but test, test, test first.
Then please provide any enhancements back on the GitHub repository. I have also created an #installomator channel on the MacAdmin Slack for discussion and questions.