

We have released a minor update to Installomator. It contains a number of small bug fixes and updated and new labels. Many thanks to everybody who contributed!
You can find the update and the detailed release notes in the repo!
We have released a minor update to Installomator. It contains a number of small bug fixes and updated and new labels. Many thanks to everybody who contributed!
You can find the update and the detailed release notes in the repo!
The big conferences expect you to provide a topic and a brief description several months in advance. This can be challenging as you have to pick something that you think will still be interesting in eight months or so, even if there is a WWDC and the larger part of the beta phase of a new macOS and iOS version in between. It also has to be able to hold my attention for about eight months, which is not an easy requirement.
I usually try to meet that challenge by choosing something that is complex enough that it has a large likelihood of remaining relevant. For this year’s JNUC, I chose “Use Swift with the Jamf API.” This would very certainly remain relevant, as both Swift and the Jamf Pro API were certain to remain in existence. I was also not expecting too great changes in either and if there were smaller changes—both Swift and the Jamf API update regularly—I was confident I would be able to handle them.
It also covered another goal I have for my presentation: it was something I didn’t really know at the time and wanted to learn more about. I had dabbled with SwiftUI before, most prominently for my 2021 MacSysAdmin Online presentation “Let’s Swift Again” and I had also tried myself with using the Jamf API from Swift. But the new concurrency features of Swift 5.5 looked like they could make the code much more interesting.
My hunch was correct. But, even though the new concurrency features simplified the code, using Swift to retrieve and work with objects from the Jamf API still remained quite a bit more complex than doing so with curl in a shell script. A JNUC session was supposed to fit into 30 minutes.
So, I hatched a crazy plan. To remain in the 30 minutes, I would just superficially introduce the most important concepts in the sessions, and then publish a tutorial and some sample code that would explain the details. Ideally, the tutorial would publish around the same time as JNUC.
Even early in putting together the session slides and sample code, I realized, there is far too much to explain for a single post. So it would become a series of posts. No problem, I have done that before. I suggested the series to Jamf marketing and they were happy to go with it, so I was committed.
I did manage to get the first part done and published in time for JNUC. Then the work that piled up over being away for the conference struck and it took a while to get part two out. Part three was published yesterday. The project is starting to take form and is diving into some really essential, but also exciting features of Swift.
I am polishing part 4 right now and will send it to the great people who run the Jamf blog for editing and more polishing soon-ish. I am working on the sequels, where we finally, actually will get into the SwiftUI part of the tutorial. I expect there to be seven parts in total, though this project may have more surprises for me yet.
I think this worked out well, even though it certainly turned out to be far more complex and far more work than I had originally anticipated. I have certainly learned a lot along the way, so that goal was achieved! I hope you will enjoy this series as much as I did writing it. (Some people like it.)
Next year, maybe I will go for something less complex… maybe…
After three betas and a lot of testing, we have (finally) released Installomator v10.
If you haven’t been following the betas, then you should really read the release notes, as well as those of the previous betas.
Major new feature is integration with Bart Reardon’s excellent Swift Dialog. Installomator can now send download and install progress to be displayed with Swift Dialog. There are several examples made by Soren Theilgaard and myself in the repo.
This update brings Installomator to more than 500 applications. And there are several more queued up in pull requests that we need to test and merge. The feedback from the community has been amazing. Many thanks to everyone who contributed and helped!
Also, many thanks to Søren, Adam, and Isaac, who are co-managing the project with me, I couldn’t do it without them!
I have written about man pages before. That post references an even older post, which is actually the second oldest post on this blog. Most of the recommendations in the posts still hold true, but there is one change relevant to macOS Ventura and one other thing that is worth adding.
Ventura’s Preview app lost the ability to render postscript or ps files. This breaks the previous, popular shell alias to open a man page in Preview. However, the amazing community in the #scripting channel of the MacAdmins Slack have figured out a replacement. They have asked me to share it.
Add this function to your shell configuration file: (bash, zsh)
preman() {
    mandoc -T pdf "$(/usr/bin/man -w $@)" | open -fa Preview
}
Then you can run preman <command> in Terminal and the man page will render beautifully in Preview. If you want to override the man command to actually use this function instead of the built-in command, add this alias:
alias man preman
If you then need to revert to the actual man command for a test of something, just add \ before the command: \man <command>
Update: Pico has expanded this into a full blown script which caches the pdfs.
Myself, I had not noticed this change, because I prefer opening the ‘yellow’ man pages in Terminal app. You can do so by entering a command in the Help menu, or by using the x-man-page URL scheme. In these yellow terminal windows, you can scroll and search in the text with command-F. You can also do a secondary click (right/ctrl/two-finger click) on any word and it will offer to open that man page in the context menu.
If the yellow man page windows annoy you, you can change their appearance by modifying Terminal’s “Man Page” profile. I modify it to use my favorite mono spaced font at a larger size. I like the yellow background because it stands out.
In the previous posts, I had a simple function you could add to your shell configuration files, but I have since refined this to also support man page sections (the number you sometimes see after a command, you can learn what they mean in the man page for the man command).
xmanpage() {
  if [[ -z $2 ]]; then
    open x-man-page://"$1"
  else
    open x-man-page://"$1"/"$2"
  fi
}
With this, you can open the desired section in the ‘yellow’ man window with xman 2 stat. This works already with the preman function. The mandoc command knows how to deal with the extra argument, the URL scheme needs a bit of extra work.
If you want to override the normal man command you can, again, use an alias in your shell configuration file:
alias man xmanpage
This way, I can have both functions in the configuration file and choose or change which function (if any) overrides the normal man by just changing the alias.
When you work in Terminal for a while you may accumulate a lot of yellow man page windows. You can use this AppleScript/osascript one-liner to close all Terminal windows which use the ‘Man Page’ profile at once.
osascript -e 'tell application "Terminal" to close (every window where name of current settings of every tab contains "Man Page")'
And while this one-liner is succint, it is still easier to wrap this in a function for your shell configuration file:
closeman() {
  osascript -e 'tell application "Terminal" to close (every window where name of current settings of every tab contains "Man Page")'
}
If you enjoyed this excursion into macOS Terminal and command line tricks and configuration, you might like one of my books: “macOS Terminal and shell” and “Moving to zsh”.
Last week I had the pleasure and honor of participating and presenting at MacDevOps YVR. The videos for the sessions are now appearing on YouTube.
There is a page for my talk “The Encyclopedia of macOS Automation,” in which I discuss the options for scripting and automation on macOS, with extra links and notes. You can go directly to the video here.
The talks this year were graphic recorded by the amazing Ashton Rodenhiser (website, twitter). The graphic at the top of this post was made by her while I was presenting.
As always, I had a lot of fun at this conference. Many thanks to the organizers and all the other speakers. Until next year!
We have updated Installomator. This brings Installomator to 465(!) applications! Many thanks to everyone who contributed.
Note: Both Google and Mozilla recommend using the pkg installers instead of the dmg downloads for managed deployments. So far, Installomator has provided labels for both. (googlechrome and googlechromepkgor firefox and firefoxpkg, respectively) Since there are problems with the dmg downloads, a future release of Installomator will disable the firefox and googlechrome dmg labels. You should switch to using the firefoxpkg or googlechromepkg labels instead.
You can find more details in the release notes.
In the last post, we discussed how to run shell commands and scripts from an Apple Script environment. In this post, we will look at how we can run AppleScript commands and scripts from the shell environment.
The key to running AppleScript from the shell is the osascript command. OSA is short for ‘Open Scripting Architecture’ which is the framework that powers AppleScript. This framework allows AppleScript to have its native language, but also use JavaScript syntax.
The osascript command allows us to run AppleScript commands from Terminal and shell. The most common use is the user interaction commands from AppleScript, like display dialog:
osascript -e 'display dialog "Hello from shell"'The -e option tells osascript that it will get one or more lines of statements as arguments. The following argument is AppleScript code. You can have multiple -e options which will work like multiple lines of a single AppleScript:
> osascript -e 'display dialog "Hello from shell"' -e 'button returned of result'
OK
osascript prints the value of the last command to stdout. In this case, it is the label of the button clicked in the dialog. (The ‘Cancel’ button actually causes the AppleScript to abort with an error, so no label will be returned for that.)
When you have multiple lines of script, using multiple -e statements will quickly become cumbersome and unreadable. It is easier to use a heredoc instead:
osascript <<EndOfScript
   display dialog "Hello from shell"
   return button returned of result
EndOfScript
This also avoids the problem of nested quotation marks and simplifies shell variable substitution.
There are a few ways to pass data into osascript from the shell.
Since the shell substitutes variables with their value before the command itself is actually executed, this works in a very straightforward manner:
computerName=$(scutil --get ComputerName)

newName=$(osascript -e "text returned of (display dialog \"Enter Computer Name\" default answer \"$computerName\")")

echo "New Name: $newName"
This works well, but because we want to use shell variable substitution for the $computerName, we have to use double quotes for the statement. That means we have to escape the internal AppleScript double quotes and everything starts to look really messy. Using a heredoc, cleans the syntax up:
computerName=$(scutil --get ComputerName)

newName=$(osascript <<EndOfScript
    display dialog "Enter Computer Name" default answer "$computerName"
    return text returned of result
EndOfScript
)

echo "New name: $newName"
I have a detailed post: Advanced Quoting in Shell Scripts.
Generally, variable substitution works well, but there are some special characters where it might choke. A user can put double quotes in the computer name. In that case, the above code will choke on the substituted string, since AppleScript believes the double quotes in the name end the string.
If you have to expect to deal with text like this, you can pass data into osascript using environment variables, and using the AppleScript system attribute to retrieve it:
computerName=$(scutil --get ComputerName)

newName=$(COMPUTERNAME="$computerName" osascript <<EndOfScript
    set computerName to system attribute "COMPUTERNAME"
    display dialog "Enter Computer Name" default answer computerName
    return text returned of result
EndOfScript
)

echo "New name: $newName"
The shell syntax
VAR="value" command arg1 arg2...sets the environment variable VAR for the process command and that command only. It is very useful.
Retrieving environment variables in AppleScript using system attribute is generally a good tool to know.
osascript can also work as a shebang. That means you can write entire scripts in AppleScript and receive arguments from the shell. For example, this script prints the path to the front most Finder window:
#!/usr/bin/osascript

tell application "Finder"
    if (count of windows) is 0 then
        set dir to (desktop as alias)
    else
        set dir to ((target of Finder window 1) as alias)
    end if
    return POSIX path of dir
end tell
You can save this as a text file and set the executable bit. I usually use the .applescript extension.
> print_finder_path.applescript
/Users/armin/Documents
To access arguments passed into a script this way, you need to wrap the main code into a run handler:
#!/usr/bin/osascript

on run arguments
    if (count of arguments) is 0 then
        error 2
    end if
    return "Hello, " & (item 1 of arguments)
end
You can combine this into a longer script:
When you ran the above script, you may have gotten this dialog:

If you didn’t get this dialog, you must have gotten it at an earlier time and already approved the access.
AppleEvents between applications are controlled by the macOS Privacy architecture. Without this, any process could use AppleEvents to gather all kinds of data from any process. These dialogs are easy enough to deal with when running from Terminal. But if you put your AppleScript code (or shell scripts calling AppleScript) into other apps or solutions, it could get messy quite quickly.
Mac Admins generally want their automations to run without any user interactions. You can avoid these dialogs by creating PPPC (Privacy Preferences Policy Control) profiles that are distributed from an MDM server. In this case you have to pre-approve the application that launches the script, which can sometimes also be challenge. The other option is to find solutions that avoid sending AppleEvents altogether.
I have a longer post detailing this: Avoiding AppleScript Security and Privacy Requests
Management scripts often run as a privileged user or root. In this case, certain features of AppleScript may behave strangely, or not at all. I generally recommend to run osascript in the user context, as detailed in this post: Running a Command as another User
AppleScript’s bad reputation may be deserved, because its syntax is strange, and often very inconsistent. Nevertheless, it has features which are hard to match with other scripting languages. You can use the strategies from this and the previous posts to combine AppleScript with Shell Scripting and other languages to get the best of both worlds.
In this series of posts, I am exploring the various different ways of launching scripts on macOS. In the first two posts, we explored what happens when you launch scripts from Terminal. We already explored some concepts such as the shell environment and how that affects scripts. In this post we are going to explore a different, but very common way to launch shell commands and scripts: AppleScript’s do shell script command.
When AppleScript made the transition from Classic Mac OS 9 and earlier to Mac OS X, it gained one command that allowed AppleScripts to interact with Mac OS X’s Unix environment. The do shell script command executes a command or script in the shell and returns the output as a text to the AppleScript.
We have used this in an earlier post:
do shell script "echo $PATH"
    --> "/usr/bin:/bin:/usr/sbin:/sbin"
But you can use this to run any shell command:
do shell script "mdfind 'kMDItemCFBundleIdentifier == org.mozilla.firefox'"
    --> "/Applications/Firefox.app"
Note the use of single quotes inside the double quotes which delineate the AppleScript text. I have a post on the challenges of quoting in these mixed scripting environments.
You can assemble the command you pass into do shell script using AppleScript text operators:
set bundleID to "org.mozilla.firefox"
do shell script "mdfind 'kMDItemCFBundleIdentifier == " & bundleID & "'"
    --> "/Applications/Firefox.app"
Note that the PATH variable for AppleScripts that are run from Script Editor or as an AppleScript applet is different than the PATH in your interactive environment. Most notably, it does not include /usr/local/bin. When you want to use a command or script that is not stored in the four default directories, you will have to use the full path in the do shell script:
do shell script "/usr/local/bin/desktoppr"(Desktoppr is a small tool I built to work with desktop pictures on macOS, you can get it here.)
When you are unsure what the full path to a command is, you can use the which command in Terminal:
> which desktoppr
/usr/local/bin/desktopprKeep in mind that which uses the same logic to lookup a command as the shell does when it looks up a command with no path. So, if you think you can trick AppleScript by using the which command to lookup a non-standard command, it will still fail:
do shell script "which desktoppr"
    --> error "The command exited with a non-zero status." number 1
When the command in do shell script returns a non-zero exit code, you will get an interactive dialog informing the user of the error. The AppleScript will not continue after the error. You can handle the error the same way you would handle any AppleScript error, with a try… on error block:
set filepath to "/unknown/file"

try
    do shell script "/usr/local/bin/desktoppr" & quoted form of filepath
on error
    display alert "Cannot set desktop picture to '" & filepath & "'"
end tryAppleScript has its own methods of addressing files and folders. Actually, there are multiple ways, which is one of the confusing things about AppleScript. Neither of the native forms of addressing files and folder in AppleScript use the standard Unix notation with forward slashes separating folders. But there are built-in tools to convert from Unix notation to AppleScript and back.
Use the POSIX path attribute to get a Unix style file path from an AppleScript file or alias. Unix style paths used with commands need spaces and other special characters escaped. You can use the quoted form attribute to escape any AppleScript string. This is usually used directly with POSIX path:
set imagefile to choose file "Select a Desktop"
    --> alias "Macintosh HD:Library:Desktop Pictures:BoringBlueDesktop.png"
set imagepath to quoted form of POSIX path of imagefile
    --> '/Library/Desktop Pictures/BoringBlueDesktop.png'
do shell script "/usr/local/bin/desktoppr " & imagepath
You can convert a Unix style file path into an AppleScript file with the POSIX file type:
set bundleID to "org.mozilla.firefox"
set appPaths to do shell script "mdfind 'kMDItemCFBundleIdentifier == " & bundleID & "'"
    --> "/Applications/Firefox.app"

if (count of paragraphs of appPaths) = 0 then
    display alert "No app found"
else
    set appPath to first paragraph of appPaths
    -- convert the path to an AppleScript file
    set appFile to POSIX file appPath
        --> file "Macintosh HD:Applications:Firefox.app:"
    tell application "Finder" to reveal appFile
end ifSometimes you are writing an AppleScript and want to use a script for some functionality which is difficult to achieve in AppleScript. When you have an AppleScript file and a shell script file that work together this way, you want to store them together and also have an easy way for one to get the location of the other.
For this, AppleScript provides the notion of script bundles and AppleScript applets (which are also bundles). A script bundle is not a flat file, but a folder which contains the script itself and other resources, such as script libraries, or shell scripts. The script can easily locate items in its bundle and call them.
For example, we want a script that needs to unzip a file. We can use the unzip command line tool to do that, but in my experience it is better to use ditto. The ditto expansion seems to be closer to how the expansion from Archive Utility works and do better with extended attributes and resource forks and other macOS specific things.
This is the shell script for our example:
#!/bin/sh

# target dir for expansion
targetdir="/Users/Shared/Script Bundle Demo"

# sanity checks for argument 1/filepath
if [ -z "$1" ]; then
    exit 2
fi

filepath=$1

# is it a file?
if [ ! -f "$filepath" ]; then
    exit 3
fi

# note: ditto seems to work better than unzip
ditto -x -k "$filepath" "$targetdir"
This is simple enough that you could just do it in a one-line do shell script, but I want to keep it simple. You could extend this shell script to use different tools to expand different types of archives, such as xar, tar, aa etc. If you want a more complex script, feel free to build one!
Now we can build the AppleScript/shell script combination. Open Script Editor, create a new script and save it right away. In the save dialog, change the ‘File Format’ to ‘Script bundle’ before saving.
After you have saved the Script as a bundle, you can see the Bundle Info in a pane on the right side of the script window. If you don’t see this pane, choose ‘Show Bundle Contents’ from the ‘View’ menu, or click the right most icon in the tool bar.
In this pane, you can set the name, identifier, version and some other data for the script bundle. You can also see a list of the ‘Resources’ which shows the contents of the Contents/Resources folder in the script’s bundle. When you find the script you save, you will see it has a scptd file extension and when you open the context menu on it in Finder, you can choose ‘Show Package Contents’ and dig into the bundle contents.
Note: AppleScript applications (or applets) work the same way. Their .app bundles have a few more sub folders, but the Resources work the same way. The difference is that AppleScript applets work on double-click, drag’n drop, and some other events that we will get to in later posts. Script bundles have to run from Script Editor.
Save the shell script from above into the script bundle’s Resources sub-directory with the name unarchive.sh. You should see it appear in the ‘Resources’ list in the script window.
This way, the AppleScript bundle can contain all the resources it might need, including shell (or other) scripts.
Now we still need to find a way to access the Resources from the script. To run our shell script, add the following code to the AppleScript in Script Editor:
-- Script Bundle Demo
set theArchive to choose file "Select a zip archive:" of type {"zip"}
set archivePath to quoted form of POSIX path of theArchive

-- assemble command
set scriptPath to quoted form of POSIX path of my (path to resource "unarchive.sh")
set commandString to scriptPath & space & archivePath

-- for debugging
log (commandString)

do shell script commandString
First we prompt the user to choose a file with a zip extension, and the we convert the result into a quoted Unix path.
Then, we use the path to resource "unarchive.sh" to get the path to our shell script in the Resources folder in the bundle. Then we get the quoted Unix notation, and assemble the command for the do shell script. The log command there will print the commandString to the output in the script window and is useful for debugging. Then we run the command with do shell script.
Our example script expands the archive into a subfolder of /Users/Shared. If you wanted to use a different location, you could use a second argument in the script.
There is a different way of passing data into scripts and that is environment variables.
First of all it is important to note that the shell environment for commands and scripts run with the do shell script command from an AppleScript in Script Editor or an AppleScript application is very different from the shell environment in an interactive shell in the Terminal. We have already seen that the PATH environment variable has a different value, which influences the command lookup behavior.
You can check the environment variable by running the env command. This will list all environment variables. (To be nitpicky, there is more to a shell environment than just the env variables, there are also shell options, but those will be different for each shell, sh, bash or zsh, anyway.)
do shell script "env"
    --> "SHELL=/bin/zsh
TMPDIR=/var/folders/2n/q0rgfx315273pb4ycsystwg80000gn/T/
USER=armin
COMMAND_MODE=unix2003
__CF_USER_TEXT_ENCODING=0x1F5:0x0:0x0
PATH=/usr/bin:/bin:/usr/sbin:/sbin
__CFBundleIdentifier=com.apple.ScriptEditor2
PWD=/
XPC_FLAGS=0x0
SHLVL=1
HOME=/Users/armin
LOGNAME=armin
_=/usr/bin/env"
Interestingly, we have USER and HOME to use in this environment.
We can also add environment variables to a do shell script command:
do shell script "TARGET_DIR='/Users/Shared/Script Bundle Demo' " & scriptPath & space & filePathYou can use this to set the value of the TARGET_DIR env variable for the next command, which is our script in the script bundle.
No matter which way you use do shell script, it has one big benefit. You can prompt the user to get the command or script to run with administrative privileges:
do shell script "systemsetup -getRemoteLogin" with administrator privilegesThis will prompt for the user name and password of an administrator user. This can allow to build some simple workflows that require user interaction and administrative privileges really easily.
Combining Script Bundles and AppleScript Applications with shell scripts can create a powerful combination. You can use the “best of both worlds” with some of AppleScript’s user interaction commands and the shell’s strength in file manipulation and similar workflows. You can also sign AppleScript applications with a valid Apple Developer ID and pre-approve them for privacy exemptions with a PPPC profile.
If this explanation is not detailed enough for you, there is an amazing Tech Note in Apple’s Documentation Archive.
This post covered launching shell scripts from AppleScript. In the next post we will launch AppleScript code from shell scripts.
In this series of posts, I will explore the many ways that you can launch a script on macOS. In the previous, inaugural post, I described what happens when you launch a script from an interactive terminal shell.
There are several virtual terminal applications available for macOS. iTerm is very popular. Some text editors like Visual Studio Code and Nova, have terminals built-in. Since the actual launching of an executable is done by the shell running inside the virtual terminal, the launch process remains the same.
That said, Terminal app has a useful trick up its sleeves.
command file extensionWhen you change the file extension of a script to .command, double-clicking the file will open it in a new Terminal window and run it there. Any input or output the script requires will happen in that Terminal window. When the script exits, the shell session in the Terminal window will exit.
Let’s take this simple script:
#!/bin/sh
echo "Enter your name: "
read -r username
echo "Hello, $username"
When you put this this in a .command file and double-click it, you get a new Terminal window with:
/Users/armin/Desktop/hello_name.command ; exit;
~ % /Users/armin/Desktop/hello_name.command ; exit;
Enter your name:
You can see that Terminal opens a new window with a new, default shell and all your configurations, then launches the script right away. The script prints its output and then waits for the user input (the read command). When you enter the name at the prompt, the script continues.
Armin
Hello, Armin

Saving session...completed.

[Process completed]
When the script ends, the shell in the Terminal window exits, as well. No more interactive prompt will be shown.
This script expects user input in the Terminal and then presents output to stdout in the same window. While you could re-write a script to use AppleScript’s display dialog to handle both in the input and the output, it would make the script significantly more complex.
Instead, you can change the file extension to .command and then a double-click will create a new Terminal window where the user interaction (input and output) takes place. For the right kind of user and workflow, this can be a sufficient solution with practically no overhead.
You can also remove the file extension completely. The behavior when you double-click such a file in Finder will be the same. Extension-less executables also get a different the icon. Either way, you need to have the executable bit set for the script.
Note: iTerm can also open .command files, but I have had some trouble with user interaction in these cases. Since I usually don’t use iTerm, maybe I have something setup wrong?
A Terminal window is not a user interface that many users will appreciate, but this allows you share scripts with other users in a form they understand. “Double-click this to run” is something that fits with most users’ idea of how macOS works.
Before you start creating dozens of .command scripts and share them, there is a major tripwire that macOS security has set up.
When you share an executable file through a website, email or a chat message, macOS will attach a quarantine flag. With applications, this flag triggers a GateKeeper scan before the app is launched and it will show the standard dialog, even when the app is signed and notarized and a much more “scary” warning when it is not.
When you launch a command or script from Terminal, either directly or indirectly with a double-click, and it still has the quarantine flag set, it will not launch. You will not get one of the standard Gatekeeper dialogs. Just an opaque operation not permitted error in the Terminal output.
You can check if a file has the quarantine flag set with the xattr command:
> xattr hello_name.command
com.apple.TextEncoding
com.apple.lastuseddate#PS
com.apple.quarantine
Your list list of extended attributes may be different. The quarantine flag has the label com.apple.quarantine.
The xattr command also can remove the quarantine flag:
> xattr -d com.apple.quarantine hello_name.commandApple seems to assume that when you are using Terminal, you know what you are doing. That means you can bypass most of the mechanisms that attach a quarantine flag with command line tools. When you download something with curl it won’t get quarantined. You can install an unsigned, unnotarized pkg installer using the installer command. Because this is possible, it doesn’t mean it is always wise. Piping a curl command directly into sh or bash or any interpreter is still poor security.
Most of the time though, a script file shared to another Mac or another user will almost certainly get the quarantine flag. Users who are comfortable with using Terminal should be able to use the xattr command to disable this protection, but this is not something for ‘normal’ users. So quarantine, makes the use of the command file extensions far less effective than it could be. This is probably intentional, since executables that are opened by double-click can be an easy way to sneak malware and other unwanted software onto a system, leveraging a user’s ignorance of what is happening.
This is generally true when you move scripts and executable files between macOS systems. I have also seen the quarantine flag getting set when you store a script in a cloud sync service (especially iCloud) or when you edit an executable with a sandboxed application.
One way around the quarantine, would be to distribute and properly install the scripts with an installer pkg. Then you can properly sign and notarize the installer pkg and the scripts will not be quarantined, as they come from a trusted and verified source. This may be a good solution for some workflows, but generally feels a bit “over-designed.”
There is a setting in Terminal’s preferences which determines what happens with windows when the shell exits. You can find it under the ‘Shell’ tab in the ‘Profiles’ area. This setting can be different for each profile. Under ‘When the shell exits’ there is a popup menu with the options ‘Close the window,’ ‘Close if the shell exited cleanly,’ and ‘Don’t close the window.’ The last ‘Don’t close’ is the default.
When you have this option set to ‘Close the window,’ the new Terminal window from a command file might only be active and visible for a short time. This may or may not be a good thing, depending on what you want.
Script files with the command file extension can be a simple, straightforward way to make scripts easily ‘launchable’ from Finder. You can also put them in the Dock or in the Login Items. The user experience is, well, a terminal, so not terribly nice, but it can be useful, and does not require any modification of the script.
When you share executable scripts, whether they have the command file extension or not, Gatekeeper quarantine on macOS can prevent the script from running. You should get familiar with the quarantine flag and the xattr command to manipulate it.
In the next post, we launch shell scripts from AppleScripts.]
When I teach or mentor shell scripting on macOS, I always have two recommendations: use BBEdit as your text editor and use shellcheck to verify sh and bash scripts.
I only discovered recently, that the two combine wonderfully!
It used to be that installing the shellcheck command line tool on macOS was a complicated process. Thankfully, the GitHub project now provides a pre-compiled binary for macOS, so you don’t have to mess with all of that anymore. The project labels the macOS version as ‘darwin.’ The binary is x86_64 (Intel) only and requires Rosetta on Apple silicon, but this doesn’t reduce its usefulness.
The easiest way to install the command is to download the archive from the repo, expand the archive, and copy the shellcheck binary to /usr/local/bin/. You can follow the instructions from this earlier post to do it in Terminal or do it with your browser and in the Finder. When you download and unarchive manually, you will have to remove the quarantine flag from the shellcheck command, before you can use it.
> xattr -d com.apple.quarantine shellcheck-latest/shellcheckI also created shellcheck recipes for AutoPkg, that automate creating a package installer for mass deployment.
Once you have the shellcheck command in place, you can use it from the command line:
> shellcheck my_great_script.shSadly, shellcheck will only work with sh and bash scripts, not with zsh scripts. On the other hand, many of the common mistakes that shellcheck catches, (mostly quoting variables) are not mistakes in zsh. Still, I miss it a lot when working on large zsh scripts.
Once you have the shellcheck command installed, you can also invoke from within BBEdit: When you have a script open in BBEdit, verify that the script is recognized as a ‘Unix shell script.’ Then you can select ‘Check Syntax…’ from the ‘#!’ menu (keyboard shortcut ⌘-K). This will open a second window with all the issues shellcheck has found.
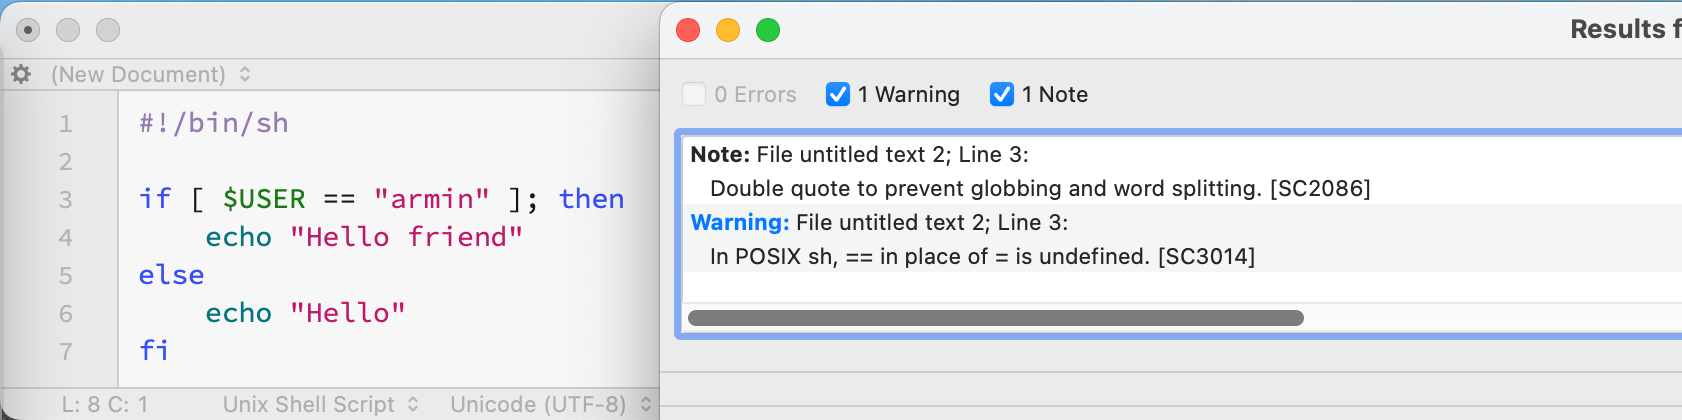
This feature was added in BBEdit 13.1, but it took me quite a while to discover it. Now I find it indispensable.
Enjoy!


